MapHub Documentation
Documentation for MapHub.net
Choose a topic from the left side menu (☰).
For news and articles, see the MapHub Blog.
Which browsers does MapHub support?
For interactive maps, use Chrome or Edge 100+, Firefox 115+, or Safari 16.4+ (including iOS/iPadOS 16.4+). Older recognized browsers may show an upgrade message and a static map image instead of an interactive map. Other browsers are not guaranteed to work; if a map does not load, try an up-to-date supported browser. Browser identification is based on the browser’s reported user agent and may be incomplete.
Map provider keys
MapHub provides a wide range of basemaps, some of which are from commercial providers (Mapbox, ESRI, HERE, etc.). These keys configure basemap access, not address search. See Search and geocoding for search providers and credits.
If your map uses a commercial basemap and receives too much traffic, we ask you to sign up for the provider’s free plan and add a key here.
Without a provider key, maps with heavy usage will be limited to MapHub Classic for 24 hours.
How to add map provider keys
AWS
ESRI
HERE Maps
Mapbox
Thunderforest
AWS provider key
How to add an AWS provider key to MapHub
This guide assumes that you already have an AWS account and can sign in to the AWS Console. Creating an AWS account is outside the scope of this guide.
The video below shows the full AWS Console flow.
-
Sign in to the AWS Console.
-
In the AWS Console, select the AWS Region that you want to use from the top right corner. In the recording, this is United States (N. Virginia), whose region code is
us-east-1.Important: Copy or write down the AWS Region code. You will need to enter this region in MapHub together with the API key.
-
Using the search bar at the top of the AWS Console, type maps. In the search results dropdown, click on Maps under the Features section. This will open the Amazon Location console.
-
In the left sidebar, under Manage resources, click on API keys.
-
Click the Create API key button.
-
Enter a name for your key, for example,
maphub-basemap-key. -
Scroll down to the Resources and actions section. In the Maps Actions column, check the box next to GetTile.
-
Leave all other actions unchecked, then scroll to the bottom and click Create API key.
-
On the newly created API key’s page, click Show API key value, and then click the copy icon next to the key string.
Important: Ensure you are copying the API key value itself, not the key name or ARN.
-
Go to your MapHub account’s Map provider keys page: link
-
Paste the copied key into the AWS API key field.
-
Paste the AWS Region code from Step 2 into the AWS Region field.
-
Click Save.
-
Congratulations, you can now use AWS basemaps on MapHub!
ESRI provider key
How to add an ESRI provider key to MapHub
This guide shows how to create a new ArcGIS Location Platform account and generate an ESRI API key for MapHub.
Note: ESRI API keys can only be valid for a maximum of 1 year. They will expire and need to be renewed annually to continue using ESRI basemaps.
- Go to the ArcGIS Location Platform.
- Click Sign up for free.
- Enter your first name, last name, and email address, then click Continue.
- On the Confirm account details page, choose a username, password, portal URL, portal display name, security question, and answer. (Note: These details are for your ArcGIS account and do not need to match your MapHub account.)
- Accept the ArcGIS Location Platform agreement and Esri privacy policy, then click Next.
- Check your email for an activation link. Click it to verify your account, then sign in.
- On the Finish setting up your account page, answer the required onboarding questions and click Finish account setup.
- On the ArcGIS Location Platform dashboard, locate the Developer credentials section and click Create developer credentials.
- Select API key credentials, then click Next.
- On Where will you use these credentials?, select Public application, then click Next.
- On Item access, select Grant access to specific items, then click Next.
- On Privileges, enable Basemaps under the Location services section, then click Next.
- On Settings, select an Expiration date. ArcGIS API keys can be valid for a maximum of one year from today.
- Leave the Referrer URLs empty, then click Next.
- On Item details, enter a title (e.g.,
maphub-api-key), then click Next. - Review the summary, make sure Generate the API key now is selected, and click Next.
- Copy the generated API key. Important: Copy the API key value immediately. The dialog is only shown once, so be sure to paste it somewhere safe before closing it. Note: Sometimes the wizard finishes without creating or showing the API key. If this happens, delete the developer credentials item you just created and start the wizard again.
- Go to your MapHub account’s Map provider keys page: link
- Paste the copied key into the ESRI API key field.
- Click Save.
- Congratulations, you can now use ESRI basemaps on MapHub!
If you do not see the dashboard wizard
Sometimes ArcGIS opens your account on the Content page instead of showing the dashboard wizard. The video below shows how to access the credential creation flow from there.
- Open your ArcGIS Content page from the top menu.
- Click the New item button.
- Select Developer credentials.
- Continue from step 9 in the guide above.
Renewing an expired API key
When your ESRI API key expires (or is about to expire), you will need to regenerate it and update it in MapHub to keep your basemaps working.
- Go to your ArcGIS Location Platform Content page.
- Click on your API key item (e.g.,
maphub-api-key). - Scroll down to the Credentials section.
- Click the Regenerate API key button.
- In the confirmation dialog, click Confirm expiration date.
- Select a new expiration date (up to a maximum of one year from today).
- Click Yes, regenerate API key.
- Copy the newly generated API key.
- Go to your MapHub account’s Map provider keys page: link
- Replace the old key by pasting the new one into the ESRI API key field and click Save.
HERE Maps provider key
How to add HERE Maps provider key to MapHub
- Sign up to for Freemium account on HERE Developers: link
- (Optional) If you don’t get automatically redirected to your Projects page, navigate to your Projects page and select your Freemium project: link
- In the REST section, click “Generate App”.
- Click “Create API key”
- Copy the generated API key
- Go to your MapHub account’s Map provider keys page: link
- Paste the copied text to HERE API key and click Save.
- Congratulations, you can now use HERE basemaps on MapHub.
Mapbox provider key
How to add a Mapbox provider key to MapHub
-
Sign up to for free account on Mapbox: link
-
Under access tokens, look for Default public token, and click the blue icon to copy the token to the clipboard. You can also select the text and copy it manually. Important: make sure the token you are selecting starts with
pk. -
Go to your MapHub account’s Map provider keys page: link
-
Paste the copied text to Mapbox Public Token field and click Save.
-
Congratulations, you can now use Mapbox basemaps on MapHub.
Thunderforest provider key
How to add a Thunderforest provider key to MapHub
-
Sign up to a free Hobby Project account on Thunderforest Maps: link
-
Confirm your account via the verification email.
-
Log in with your registered credentials.
-
Copy the API Key from the dashboard.
-
Go to your MapHub account’s Map provider keys page: link
-
Paste the copied text to Thunderforest API key field and click Save.
-
Congratulations, you can now use Thunderforest basemaps on MapHub.
Import and Export
Import
XLSX / CSV import
Export
Choose Download for whole-map downloads. In edit mode, the buttons are arranged as GeoJSON / Image, Excel XLSX / Excel CSV, GPX / KML, followed by a full-width Archive ZIP button. Available formats depend on the map content and your access.
The Archive ZIP is a full backup of the map: its items, settings, uploaded images, custom markers, legend image, and logos.
To export a selection instead, use Export selected items in the Item tab or Download panel. Choose GeoJSON, KML, Excel XLSX, or Excel CSV; KML is shown when the selection includes geometry. Excel exports require a Business plan.
Simplifying a map
In edit mode on desktop, choose Simplify map under Simplify polygons and lines in the map panel. Select a percentage and choose Preview. The preview removes detail from polygons and lines while preserving items, properties, points, circles, and unlocated items. Choose Apply to keep it or Cancel to restore the map. Canceling or leaving the panel also stops simplification in progress.
If the requested percentage would remove a shape or change its geometry type, MapHub tries up to ten levels in total, reducing the percentage by one each time, and displays the percentage used for the preview. If none is suitable, it shows the original shapes. Existing shapes that cannot be processed are left unchanged without a warning.
Higher percentages remove more detail, but file-size savings vary. Small holes may disappear during simplification; item records and their properties are preserved.
XLSX / CSV import
MapHub imports data from CSV, XLS, XLSX, and ODS files. We recommend XLSX.
Quick start
Say you have a spreadsheet like this:
| address | name |
|---|---|
| 1600 Pennsylvania Ave, Washington | White House |
| 10 Downing Street, London, UK | UK PM Residence |
- Open or create a map.
- Click Import and upload your file.
- MapHub finds the locations and adds them to your map.
Rows that can’t be located go to Unlocated Items — select one and click Place Item to position it manually.
How MapHub locates a row
MapHub checks your columns in this order:
- Coordinates — latitude and longitude columns → placed directly.
- Complete address — a single address column → geocoded.
- Address components — street, city, postal code, etc. → joined and geocoded.
- GeoJSON — a geojson column with geometry data.
The first match applies to the whole file. For example, if your file has both latitude/longitude and address columns, MapHub uses coordinates and skips geocoding.
Rows without a valid location go to Unlocated Items.
Column reference
Column names are matched case-insensitively. Spaces, hyphens, and underscores are treated the same (Postal_Code = postal code).
Names not listed below (like location, place, town) won’t be recognized — rename them to a supported name.
Coordinates
| Field | Recognized names |
|---|---|
| Latitude | lat, latitude |
| Longitude | lng, lon, long, longitude |
Latitude must be −90 to 90, longitude −180 to 180.
Complete address
A single column with the full address. MapHub geocodes each value to find its location.
| Field | Recognized names |
|---|---|
| Complete address | address, addr, full address, street address |
Only this column is geocoded. Other columns like country are not appended automatically. If your addresses need a country, include it in the address text or use the component columns below.
Address components
If your addresses are split across columns, use these names. MapHub joins them and geocodes the result.
| Field | Recognized names |
|---|---|
| House number | house number, house no, street number |
| Street | street |
| City | city |
| State | state, province, region |
| Postal code | postal code, zip, zipcode, zip code, postcode |
| Country | country, country code |
You need street and at least city or a postal code column.
Other columns
| Column | Notes |
|---|---|
title or name | Item title |
description or desc | Item description (Markdown supported) |
group | Group name (see Groups below) |
url | Link URL |
color | Hex color, e.g. #CC1B15 |
visible | true/false or 1/0 |
media_url | e.g. a YouTube video URL |
icon | MapHub icon id (for points) |
label, hide_text | true/false item states |
circle_radius_meters | Positive radius; use with latitude/longitude |
line_width, fill_opacity | Shape styles |
marker_rotation, marker_size, marker_offset_x, marker_offset_y | Custom marker settings |
maphub_image_url | Image reference from a MapHub export |
GeoJSON column
For advanced use, include a column named geojson with a GeoJSON Geometry string:
- Point:
{"type":"Point","coordinates":[-74.00,40.71]} - Polygon:
{"type":"Polygon","coordinates":[[[100.0,0.0],[101.0,0.0],[101.0,1.0],[100.0,1.0],[100.0,0.0]]]} - LineString:
{"type":"LineString","coordinates":[[102.0,0.0],[103.0,1.0],[104.0,0.0],[105.0,1.0]]}
Combining columns in Excel
If your columns have names MapHub doesn’t recognize (like Location or Town), you have two options: rename them to a supported name, or combine them into a new address column.
To combine, say your spreadsheet looks like this:
| A (Location) | B (Town) | C (State) | D (ZIP) | |
|---|---|---|---|---|
| Row 2 | 10 Main St | Boston | MA | 02108 |
Add a new column E called address. In cell E2, type:
=A2 & ", " & B2 & ", " & C2 & ", " & D2
This produces: 10 Main St, Boston, MA, 02108.
Drag the formula down to fill all rows. Then before uploading:
- Select the address column.
- Copy it (Ctrl+C).
- Paste as values (Ctrl+Shift+V) so it becomes plain text, not a formula.
Now upload the file and MapHub will geocode the addresses.
In Google Sheets, use Edit → Paste special → Values only.
Tip: If your data has postal codes with leading zeros (like
02108), format that column as Text in Excel before entering values. Otherwise Excel may drop the leading zero.
Groups
Browser imports place items under Imported from <filename>.
Use this format in the group column for nested groups:
North America/United States/California/Los Angeles
Note: use exactly this / character (not a normal /). Copy and paste it.
Sample: Multi-level group sample
Re-importing a MapHub export
MapHub exports include longitude, latitude, and geojson columns, even when empty. If you want to re-import for address geocoding, delete the longitude and latitude columns first. Otherwise MapHub uses coordinate mode and skips geocoding.
API imports don’t geocode — provide coordinates or GeoJSON directly.
Sample files
Download a sample from this map (click Download → Excel XLSX or CSV):
The museums.csv sample has Name, Description, and Address columns. Each address includes the country (e.g. “Rue de Rivoli, 75001 Paris, France”) — download it to try.
Credits
Address geocoding uses the map owner’s Commercial credits, one per unique address. If credits run low, MapHub locates as many addresses as this month’s credits cover. The rest go to Unlocated Items. See Search and geocoding — Credits for amounts and when new credits arrive.
Importing latitude/longitude coordinates does not use credits.
Search and geocoding
Geocoding turns a place name or address into a location on a map. MapHub uses it in two places:
- Search box — the search in the top-left corner of the map.
- Spreadsheet import — when you upload a file with addresses. See XLSX / CSV import.
Providers
| Provider | Notes |
|---|---|
| Open Data | Great for everyday searches. Available on all plans. |
| Commercial | Best results. Available on paid plans. Spreadsheet imports always use Commercial. |
| Free | Basic results. |
What each plan includes
The map owner’s plan applies, including when you edit someone else’s map.
| Plan | Editor search | Visitor search | Spreadsheet import |
|---|---|---|---|
| Free | Open Data, Free | Off | No |
| Hobbyist | Commercial, Open Data, Free | Free | Yes |
| Business | Commercial, Open Data, Free | Commercial, Open Data, Free | Yes |
| Enterprise | Commercial, Open Data, Free | Commercial, Open Data, Free | Yes |
Choosing a provider
In the right sidebar, open Map → Visitor view → Search (or Map → Search on private maps):
- While editing — your default on every map you edit.
- Visitors — the provider visitors use on this map. Tick Also in embeds to show search on embedded maps too. Only the map owner sees this setting.
To switch temporarily, use the provider button in the top-left search box. If results are showing, the search runs again with the new provider. Reloading the page brings back your default.
Credits
Open Data and Commercial searches use monthly credits. Free search doesn’t. One search or one unique imported address uses one credit.
| Plan | Open Data | Commercial | Commercial visitor |
|---|---|---|---|
| Free | 50 | — | — |
| Hobbyist | 500 | 25 | — |
| Business (per seat) | 2,000 | 100 | 800 |
| Enterprise | Custom | Custom | Custom |
Commercial covers editor searches and spreadsheet imports. Commercial visitor covers visitor and embed searches.
Credits belong to the map owner, so searches by collaborators and visitors use the owner’s credits. New credits arrive on the 1st of each month.
You can see how many credits are left in the Search dialog and under Settings → Billing & plans.
When credits run low
When a provider’s credits run out, search with it pauses until the 1st of the month. For more credits every month, upgrade your plan, or add seats on Business.
For spreadsheet imports, MapHub locates as many addresses as this month’s credits cover. The rest go to Unlocated Items, where you can place them manually. Importing latitude/longitude columns never uses credits.
MapHub API
The HTTP API is inspired by the Dropbox API v2.
-
MapHub API uses HTTP POST requests with JSON arguments and JSON responses.
-
Request authentication is via API keys using the
Authorization: Token <api_key>request header. -
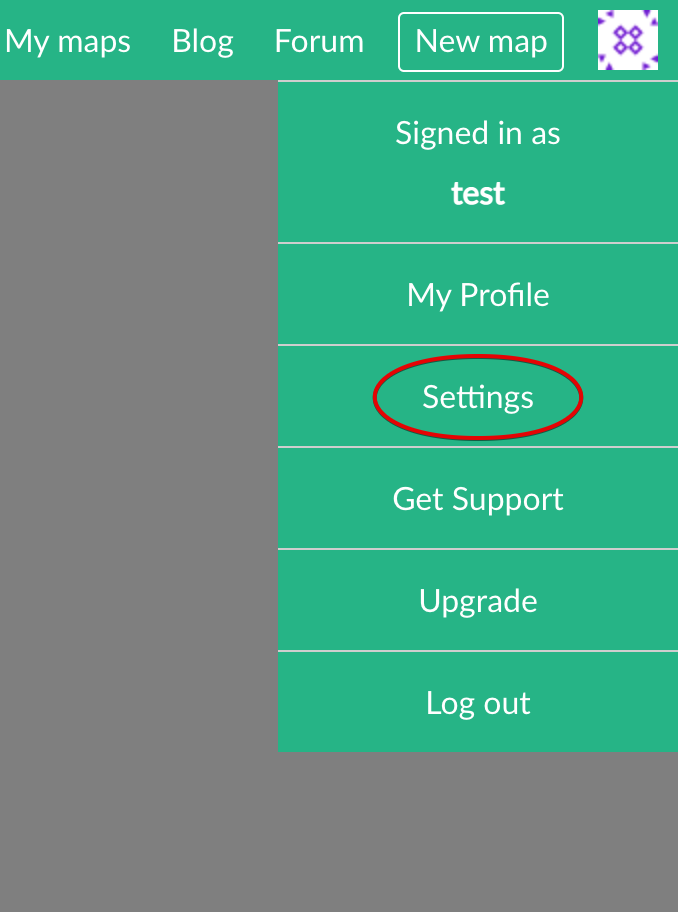
You can create API keys from the Settings page:
-
To use the API, you need to verify your email address.
-
Errors are returned in the
errorJSON field, status code is always 200.A successful response has no
errorfield.
Request and response formats
Endpoints accept arguments as JSON in the request body and return results as JSON in the response body.
The Upload and Append endpoints accept file content in the request body, so their arguments are instead passed as JSON in the MapHub-API-Arg request header.
Endpoints
You can see the currently implemented endpoints in the left side menu.
If you’d like to see more API endpoints or need some added features, please contact us.
MapHub Enterprise API usage
The API for Enterprise users is the same as with the public website, except the maphub.net URL is changed to your server’s URL. For example, instead of
https://maphub.net/api/1/map/list
please use
https://companyname.maphub.net/api/1/map/list
List maps
https://maphub.net/api/1/map/list
List all maps available for the user.
Arguments
This endpoint takes no arguments.
Response
The response returns 3 keys, each containing list of maps:
- owner: the user’s maps
- editor: maps where the user can edit, but is not the owner
- viewer: maps where the user can view, but cannot edit and is not the owner
For each map in the lists, the following properties are returned:
- id: id of the map
- url: URL of the map
- owner: map owner’s username
- short_name: short name of the map, used in the URL
- title: title of the map
- visibility: visibility mode of the map. One of
public,unlisted,private,select.
Code example
curl
curl https://maphub.net/api/1/map/list \
    --header 'Authorization: Token <api_key>' \
    --data-raw ''
Python
import requests

url = 'https://maphub.net/api/1/map/list'

api_key = '<api_key>'

headers = {'Authorization': 'Token ' + api_key}
r = requests.post(url, headers=headers)

print(r.json())
Get map
https://maphub.net/api/1/map/get
Get all information about single map, including GeoJSON.
Arguments
- map_id (required): the id of the map. To find out a map’s id, please use the list maps endpoint.
Response
The response returns the following keys:
-
id: The id of the map.
-
url: The full URL of the map.
-
owner: The map owner’s username.
-
short_name: The short name of the map, used in the URL.
-
title: The title of the map.
-
description: The description of the map.
-
geojson: The GeoJSON for the map. This includes information related to groups, custom icons and images as well.
-
basemap: The basemap used by the map.
-
visibility: The visibility mode of the map. One of
public,unlisted,private,select. -
collaborate: Whether collaboration is enabled/disabled for the map. True/False
-
viewer_users: The list of specified viewers, if visibility mode is
select. -
editor_users: The list of editors, if collaboration is enabled.
-
created_date: The date when the map was created. ISO datetime string in UTC timezone.
-
modified_date: The date when the map was last updated. ISO datetime string in UTC timezone.
-
images: The list of image ids present in the map’s GeoJSON.
-
markers: The list of marker ids present in the map’s GeoJSON. Markers = custom icons on the web interface.
Code example
curl
curl https://maphub.net/api/1/map/get \
    --header 'Authorization: Token <api_key>' \
    --data-raw '{"map_id": 12345}'
Python
import requests

url = 'https://maphub.net/api/1/map/get'

api_key = '<api_key>'

args = {
    'map_id': 12345,
}

headers = {'Authorization': 'Token ' + api_key}
r = requests.post(url, json=args, headers=headers)

print(r.json())
Upload map
https://maphub.net/api/1/map/upload
Upload a file and create a new map.
When empty is used for file_type, an empty map will be created.
A static image is automatically generated for the uploaded map.
For this endpoint you’ll need to
- send the arguments as a JSON encoded string in the
MapHub-API-Argheader - send the uploaded file as binary data in the request body (except with
emptyfile_type)
Arguments
- file_type (required): one of
empty,kml,gpx,geojson,csv, orexcel. For KMZ files, usekml. For XLS, XLSX, and ODS files, useexcel. - visibility (required): The visibility option of the map. One of
public,unlisted,private. - title (optional): the preferred title of the map
- description (optional): the preferred description of the map
- short_name (optional): the short name of the map, visible in the URL. This is just a preference, the final URL will be returned in the response.
Response
- id: id of the map
- url: URL of the map
- owner: map owner’s username
- short_name: short name of the map, used in the URL
- title: title of the map
- visibility: visibility mode of the map. One of
public,unlisted,private,select.
Limitations
Following limits apply to uploads:
- maximum file size 15 MB
- maximum processing time 2 minutes
On a MapHub Enterprise server, there are no limits. If you are interested in MapHub Enterprise, contact us.
Multi-level groups
You can create multi-level groups by using the following format for “group”.
North America/United States/California/Los Angeles
Note, you have to use exactly this / character. Please copy and paste it. It is not the same as the normal / character.
Code example
curl with file
curl https://maphub.net/api/1/map/upload \
    --header 'Authorization: Token <api_key>' \
    --header 'MapHub-API-Arg: {"file_type": "gpx", "visibility": "public"}' \
    --data-binary @test.gpx
curl with geojson data
curl https://maphub.net/api/1/map/upload \
    --header 'Authorization: Token <api_key>' \
    --header 'MapHub-API-Arg: {"file_type": "geojson", "visibility": "public"}' \
    --data-raw '{"type": "FeatureCollection", "features": [{"type": "Feature", "geometry": {"type": "Point", "coordinates": [12.34, 56.78]}, "properties": {"title": "Test point", "description": "Test description", "group": 12345}}], "groups": [{"title": "Test group", "id": 12345}]}'
Python with file
import json
import requests

url = 'https://maphub.net/api/1/map/upload'

api_key = '<api_key>'

args = {
    'file_type': 'gpx',
    'title': 'Sample Title',
    'short_name': 'short name',
    'visibility': 'public',
}

headers = {
    'Authorization': 'Token ' + api_key,
    'MapHub-API-Arg': json.dumps(args),
}

with open('test.gpx', 'rb') as f:
    r = requests.post(url, headers=headers, data=f)

print(r.json())
Python with geojson data
import json
import requests

url = 'https://maphub.net/api/1/map/upload'

api_key = '<api_key>'

args = {
    'file_type': 'geojson',
    'title': 'Sample Title',
    'short_name': 'short name',
    'visibility': 'public',
}

headers = {
    'Authorization': 'Token ' + api_key,
    'MapHub-API-Arg': json.dumps(args),
}

geojson = {
    "type": "FeatureCollection",
    "features": [
        {
            "type": "Feature",
            "geometry": {"type": "Point", "coordinates": [12.34, 56.78]},
            "properties": {
                "title": 'Test point',
                "description": 'Test description',
                "group": 12345,
            },
        }
    ],
    "groups": [{"title": 'Test group', "id": 12345}],
}


r = requests.post(url, headers=headers, data=json.dumps(geojson))
print(r.json())
Python empty map
import json
import requests

url = 'https://maphub.net/api/1/map/upload'

api_key = '<api_key>'

args = {
    'file_type': 'empty',
    'title': 'Sample Title',
    'short_name': 'short name',
    'visibility': 'public',
}

headers = {
    'Authorization': 'Token ' + api_key,
    'MapHub-API-Arg': json.dumps(args),
}


r = requests.post(url, headers=headers)
print(r.json())
Update map
https://maphub.net/api/1/map/update
Update a map, including the GeoJSON.
For GeoJSON it means that the contents of the whole map is replaced with the new supplied geojson data.
Only the included arguments will be updated. For example if only short_name is included, nothing else will be changed.
When updating the GeoJSON of a map, images and markers are “linked”, you do not need to upload them again.
Static map image is not updated automatically. If you’d like to update it, call the refresh map image endpoint manually.
A new map version is not saved.
Arguments
-
map_id (required): the id of the map. To find out a map’s id, please use the list maps endpoint.
-
title (optional): The title of the map.
-
short_name (optional): The short name of the map, used in the URL.
-
description (optional): The description of the map.
-
geojson (optional): The GeoJSON for the map. This includes information related to groups, custom icons and images as well.
-
basemap (optional): The basemap used by the map.
-
visibility (optional): The visibility setting of the map. One of
public,unlisted,private.
Response
- id: id of the map
- url: URL of the map
- owner: map owner’s username
- short_name: short name of the map, used in the URL
- title: title of the map
- visibility: visibility mode of the map. One of
public,unlisted,private,select.
Code example
curl
curl https://maphub.net/api/1/map/update \
    --header 'Authorization: Token <api_key>' \
    --data-raw '{"map_id": 12345, "short_name": "test_short_name_abc", "title": "Test Title ABC", "geojson": {"type": "FeatureCollection", "features": [{"type": "Feature", "geometry": {"type": "Point", "coordinates": [12.34, 56.78]}, "properties": {"title": "Test point", "description": "Test description", "group": 12345}}], "groups": [{"title": "Test group", "id": 12345}]}}'
Python
import requests

url = 'https://maphub.net/api/1/map/update'

api_key = '<api_key>'

geojson = {
    "type": "FeatureCollection",
    "features": [
        {
            "type": "Feature",
            "geometry": {"type": "Point", "coordinates": [12.34, 56.78]},
            "properties": {
                "title": 'Test point',
                "description": 'Test description',
                "group": 12345,
            },
        },
        {
            "type": "Feature",
            "geometry": {"type": "Point", "coordinates": [13.34, 57.78]},
            "properties": {
                "title": 'Test point 2',
                "description": 'Test description',
                "group": 12345,
            },
        }
    ],
    "groups": [{"title": 'Test group', "id": 12345}],
}

args = {
    'map_id': 12345,
    'short_name': 'test_short_name_abc',
    'title': 'Test Title ABC',
    'geojson': geojson,
}

headers = {'Authorization': 'Token ' + api_key}
r = requests.post(url, json=args, headers=headers)

print(r.json())
Append map
https://maphub.net/api/1/map/append
Upload a file and append to an existing map.
Static map image is not updated automatically. If you’d like to update it, call the refresh map image endpoint manually.
A new map version is not saved.
For this endpoint you’ll need to
- send the arguments as a JSON encoded string in the
MapHub-API-Argheader - send the uploaded file as binary data in the request body
Arguments
- map_id (required): The id of the map. To find out a map’s id, please use the list maps endpoint.
- file_type (required): One of
kml,gpx,geojson,csv, orexcel. For KMZ files, usekml. For XLS, XLSX, and ODS files, useexcel. - new_group (optional): A string that names a group for the imported content. For table imports, this group becomes the import root and preserves source subgroups below it. For other formats, all imported items are placed directly in this group.
Response
- id: id of the map
- url: URL of the map
- owner: map owner’s username
- short_name: short name of the map, used in the URL
- title: title of the map
- visibility: visibility mode of the map. One of
public,unlisted,private,select.
Limitations
Following limits apply to uploads:
- maximum file size 15 MB
- maximum processing time 2 minutes
On a MapHub Enterprise server, there are no limits. If you are interested in MapHub Enterprise, contact us.
Code example
curl with file
curl https://maphub.net/api/1/map/append \
    --header 'Authorization: Token <api_key>' \
    --header 'MapHub-API-Arg: {"map_id": 12345, "file_type": "kml"}' \
    --data-binary @test.kml
curl with geojson data
curl https://maphub.net/api/1/map/append \
    --header 'Authorization: Token <api_key>' \
    --header 'MapHub-API-Arg: {"map_id": 12345, "file_type": "geojson"}' \
    --data-raw '{"type": "FeatureCollection", "features": [{"type": "Feature", "geometry": {"type": "Point", "coordinates": [23.45, 34.56]}, "properties": {"title": "Test point", "description": "Test description", "group": 12345}}], "groups": [{"title": "Test group", "id": 12345}]}'
Python with file
import json
import requests

url = 'https://maphub.net/api/1/map/append'

api_key = '<api_key>'

args = {
    'map_id': 12345,
    'file_type': 'kml',
}

headers = {
    'Authorization': 'Token ' + api_key,
    'MapHub-API-Arg': json.dumps(args),
}

with open('test.kml', 'rb') as f:
    r = requests.post(url, headers=headers, data=f)

print(r.json())
Python with geojson data
import json
import requests

url = 'https://maphub.net/api/1/map/append'

api_key = '<api_key>'

args = {
    'map_id': 12345,
    'file_type': 'geojson',
}

headers = {
    'Authorization': 'Token ' + api_key,
    'MapHub-API-Arg': json.dumps(args),
}

geojson = {
    "type": "FeatureCollection",
    "features": [
        {
            "type": "Feature",
            "geometry": {"type": "Point", "coordinates": [12.34, 56.78]},
            "properties": {
                "title": 'Test point',
                "description": 'Test description',
                "group": 2345,
            },
        }
    ],
    "groups": [{"title": 'Test group 234', "id": 2345}],
}


r = requests.post(url, headers=headers, data=json.dumps(geojson))
print(r.json())
Refresh static map image
https://maphub.net/api/1/map/refresh_image
Refresh the static image of a map.
Static map images are used by embeds and the Download / Image dialog.
If the map is using a premium basemap, you need to add the basemap’s API key first.
Note: This endpoint is very resource intensive, please limit it to max. 1 call every 5 minutes.
Arguments
- map_id (required): the id of the map. To find out a map’s id, please use the list maps endpoint.
Response
The response returns the following keys:
- id: id of the map
- url: URL of the map
- owner: map owner’s username
- short_name: short name of the map, used in the URL
- title: title of the map
- visibility: visibility mode of the map. One of
public,unlisted,private,select.
Code example
curl
curl https://maphub.net/api/1/map/refresh_image \
    --header 'Authorization: Token <api_key>' \
    --data-raw '{"map_id": 12345}'
Python
import requests

url = 'https://maphub.net/api/1/map/refresh_image'

api_key = '<api_key>'

args = {
    'map_id': 12345,
}

headers = {'Authorization': 'Token ' + api_key}
r = requests.post(url, json=args, headers=headers)

print(r.json())
Upload image
https://maphub.net/api/1/image/upload
This endpoint uploads a JPG, PNG, HEIC or WebP image, resizes it to responsive sizes and stores it on the server.
The endpoint returns the image_id of the uploaded image, as well as width/height and other properties that you need to use when uploading or updating a GeoJSON of map.
When updating the GeoJSON of a map, images and markers are “linked”, you do not need to upload them again.
Images are automatically deleted once they are no longer used in any map.
For this endpoint you’ll need to
- send the arguments as a JSON encoded string in the
MapHub-API-Argheader - send the uploaded file as binary data in the request body
Arguments
- file_type (required): one of
jpg,jpeg,png,heic,webp
Response
- image_id: the id of the image
- width: the width of the image in pixels
- height: the height of the image in pixels
- tip_color: the color of the image popup’s tip at the bottom center
- avg_color: the average color of the image, displayed before loading
- has_gps: if the image has GPS information, true/false
- geometry: GeoJSON geometry if the image has GPS information. null if not.
- date_str: image’s original created date in a human readable text
- date_iso: image’s original created date in ISO datetime format
Limitations
Following limits apply to uploads:
- maximum file size 15 MB
- maximum processing time 2 minutes
On a MapHub Enterprise server, there are no limits. If you are interested in MapHub Enterprise, contact us.
Code example
curl
curl https://maphub.net/api/1/image/upload \
    --header 'Authorization: Token <api_key>' \
    --header 'MapHub-API-Arg: {"file_type": "png"}' \
    --data-binary @test.png
Python
import json
import requests

url = 'https://maphub.net/api/1/image/upload'

api_key = '<api_key>'

args = {
    'file_type': 'jpg',
}

headers = {
    'Authorization': 'Token ' + api_key,
    'MapHub-API-Arg': json.dumps(args),
}

with open('test.jpg', 'rb') as f:
    r = requests.post(url, headers=headers, data=f)

print(r.json())
Upload marker
https://maphub.net/api/1/marker/upload
Markers are custom icons which can be uploaded for points.
This endpoint uploads a PNG image, resizes it to the right size and stores it on the server.
The endpoint returns the marker_id of the uploaded marker, that you need to use when uploading or updating a GeoJSON of map.
When updating the GeoJSON of a map, images and markers are “linked”, you do not need to upload them again.
Markers are automatically deleted once they are no longer used in any map.
For this endpoint you’ll need to
- send the arguments as a JSON encoded string in the
MapHub-API-Argheader - send the uploaded file as binary data in the request body
Arguments
- file_type (required): currently only supported:
png
Response
- marker_id: the id of the marker
Limitations
Following limits apply to uploads:
- maximum file size 15 MB
- maximum processing time 2 minutes
On a MapHub Enterprise server, there are no limits. If you are interested in MapHub Enterprise, contact us.
Code example
curl
curl https://maphub.net/api/1/marker/upload \
    --header 'Authorization: Token <api_key>' \
    --header 'MapHub-API-Arg: {"file_type": "png"}' \
    --data-binary @test.png
Python
import json
import requests

url = 'https://maphub.net/api/1/marker/upload'

api_key = '<api_key>'

args = {
    'file_type': 'png',
}

headers = {
    'Authorization': 'Token ' + api_key,
    'MapHub-API-Arg': json.dumps(args),
}

with open('test.png', 'rb') as f:
    r = requests.post(url, headers=headers, data=f)

print(r.json())
MapHub API tutorial
Create a map from a CSV table
This is a detailed tutorial explaining the concepts behind MapHub’s API.
As part of this tutorial, you’ll create a Python script, which takes a table (in CSV format) and a directory of images and creates an interactive MapHub map, entirely programmatically.
The table
| title | description | url | icon_default | icon_custom | image | longitude | latitude |
|---|---|---|---|---|---|---|---|
| British Museum | The world-famous British Museum… | https://www.britishmuseum.org/ | museum | british.jpg | -0.128018 | 51.519294 | |
| National Gallery | The crowning glory of Trafalgar Square… | star | national.jpg | -0.128374 | 51.508884 | ||
| Tate Modern | Sitting grandly on the banks of the Thames is Tate Modern… | https://www.tate.org.uk/visit/tate-modern | museum | tatemodern.jpg | -0.099342 | 51.507429 | |
| Victoria and Albert Museum | The V&A celebrates art and design with 3,000 years’… | https://www.vam.ac.uk/ | va.png | va.jpg | -0.171637 | 51.496884 |
The created Map
Links
Source code for the tutorial on GitHub: repo - zip archive
Table on Google Docs: link
Preparation
You need Python 3.6+ and the requests library. The tutorial is the same for macOS, Windows and Linux. To install requests, run
pip3 install requests
You can download all the images and the table in CSV format on the following link: zip archive. The files for this tutorial are in the map_from_table folder.
Create your API token
If you haven’t done it already, you need to make an API token for MapHub. This is explained on the following page: API docs.
Create a new map
Step 2: Create a new map
To create an empty map, we’ll call the Upload map endpoint. The core function is the following:
url = 'https://maphub.net/api/1/map/upload'

args = {
    'file_type': 'empty',
    'title': 'London Attractions',
    'short_name': 'london-attractions',
    'visibility': 'public',
}

headers = {
    'Authorization': 'Token ' + API_KEY,
    'MapHub-API-Arg': json.dumps(args),
}

res = requests.post(url, headers=headers)
data = res.json()
When used with file_type=empty, the Upload map endpoint creates a new map.
In the script, we save the returned map’s id into a JSON file (map_data.json). In later steps, we’ll read the map id from this JSON file.
map_data.json sample
{
  "id": 12345,
  "url": "https://maphub.net/test/london-attractions",
  "owner": "test",
  "short_name": "london-attractions",
  "title": "London Attractions",
  "visibility": "public"
}
Full script file
Upload images and markers
Step 3: Upload images and markers
MapHub treats images separate from maps. If you’d like to use an image in a map, you’ll have to upload it first. Once an image is uploaded, you have to store the returned information about the image, so you can later use it in a map. In this tutorial, we store this information in a JSON file, next to each image.
A note about markers: markers are user-uploaded, custom icons for points. You have to upload them in advance, just like images.
The code for this step is in 2 parts:
1. Loop through each image and marker to upload them
# for each image in the images dir
for file_path in list(IMAGES_DIR.glob('*.jpg')) + list(IMAGES_DIR.glob('*.png')):
    # upload image
    upload_image_marker('image', file_path)

# for each marker in the markers dir
for file_path in MARKERS_DIR.glob('*.png'):
    # upload marker
    upload_image_marker('marker', file_path)
2. The core of the upload function:
def upload_image_marker(kind, file_path):
    # path where we store the info JSON
    info_json = file_path.parent / f'{file_path.stem}.json'

    # if the JSON file exists, the image/marker is already uploaded, skip the upload
    if info_json.is_file():
        print(f'Skipping {kind} {file_path.name}')
        return

    url = f'https://maphub.net/api/1/{kind}/upload'

    # use the file's extension as file_type
    args = {
        'file_type': file_path.suffix[1:],
    }

    headers = {
        'Authorization': 'Token ' + API_KEY,
        'MapHub-API-Arg': json.dumps(args),
    }

    with open(file_path, 'rb') as f:
        # the upload request
        res = requests.post(url, headers=headers, data=f)
        data = res.json()

    # check that upload was successful, if not print error
    if f'{kind}_id' not in data:
        print(data['error'])
        return

    # save the image_info dict to disk
    with open(info_json, 'w') as f:
        json.dump(data, f, indent=2)
image.json sample
{
  "image_id": "nnhio1dgalldkf4x",
  "width": 640,
  "height": 360,
  "tip_color": "#bfbbcb",
  "avg_color": "#8a93a9",
  "has_gps": false,
  "geometry": null,
  "date_str": null,
  "date_iso": null
}
marker.json sample
{
  "marker_id": "eeumhz32iv0yfcfn"
}
Full script file
MapHub GeoJSON
Step 4: Make the GeoJSON
In this step, we’ll generate a GeoJSON from the CSV table data. Later we call the Update map endpoint with the generated GeoJSON.
GeoJSON on MapHub
Every map on MapHub is stored as a GeoJSON document. All map data: points, polygons, etc. are stored in this single document. To understand the structure of a MapHub map, the best thing is to download a map you’ve created as GeoJSON.
You can do this by opening one of your maps on MapHub.net and clicking on the “Download” button in the right side panel and then selecting “GeoJSON”.
For example, the finished map of this tutorial has the following GeoJSON:
{
  "type": "FeatureCollection",
  "features": [
    {
      "type": "Feature",
      "id": 515312282,
      "geometry": {
        "type": "Point",
        "coordinates": [-0.128018, 51.519294]
      },
      "properties": {
        "title": "British Museum",
        "description": "The world-famous British Museum exhibits the works of man from prehistoric to modern times, from around the world. Highlights include the Rosetta Stone, the Parthenon sculptures and the mummies in the Ancient Egypt collection.",
        "url": "https://www.britishmuseum.org/",
        "marker-symbol": "museum",
        "image": {
          "id": "pwasvdaus75tnn3w",
          "w": 640,
          "h": 360,
          "tip_color": "#bdbbcb",
          "avg_color": "#8895aa"
        }
      }
    },
    {
      "type": "Feature",
      "id": 521910492,
      "geometry": {
        "type": "Point",
        "coordinates": [-0.128374, 51.508884]
      },
      "properties": {
        "title": "National Gallery",
        "description": "The crowning glory of Trafalgar Square, London's National Gallery is a vast space filled with western European paintings from the 13th to the 19th centuries. Find works by masters such as Van Gogh, da Vinci, Botticelli, Constable, Renoir, Titian and Stubbs.",
        "marker-symbol": "star",
        "image": {
          "id": "pr1xhpavd1atxs5l",
          "w": 640,
          "h": 360,
          "tip_color": "#8d857b",
          "avg_color": "#8c8c8e"
        }
      }
    },
    {
      "type": "Feature",
      "id": 1233836134,
      "geometry": {
        "type": "Point",
        "coordinates": [-0.099342, 51.507429]
      },
      "properties": {
        "title": "Tate Modern",
        "description": "Sitting grandly on the banks of the Thames is Tate Modern, Britain's national museum of modern and contemporary art. Its unique shape is due to it previously being a power station. The gallery's restaurants offer fabulous views across the city.",
        "url": "https://www.tate.org.uk/visit/tate-modern",
        "marker-symbol": "museum",
        "image": {
          "id": "yibgsqadfifyaste",
          "w": 640,
          "h": 360,
          "tip_color": "#8493ab",
          "avg_color": "#9c9ea1"
        }
      }
    },
    {
      "type": "Feature",
      "id": 3383498660,
      "geometry": {
        "type": "Point",
        "coordinates": [-0.171637, 51.496884]
      },
      "properties": {
        "title": "Victoria and Albert Museum",
        "description": "The V&A celebrates art and design with 3,000 years' worth of amazing artefacts from around the world. A real treasure trove of goodies, you never know what you'll discover next: furniture, paintings, sculpture, metalwork and textiles; the list goes on.",
        "url": "https://www.vam.ac.uk/",
        "marker_id": "bvd5ykfilp7ekxyh",
        "image": {
          "id": "ikxqpaqycbrpannw",
          "w": 640,
          "h": 360,
          "tip_color": "#d1b896",
          "avg_color": "#725d42"
        }
      }
    }
  ],
  "groups": []
}
Note: Some keys like markers, properties and export are not displayed here, as they are not important for this tutorial.
The id fields are optional, you can leave them out and they’ll be automatically created.
Creating the GeoJSON from the table data
The following function is the core of this tutorial, it creates a GeoJSON from the table data we have. It also reads information from the image and marker JSONs and inserts it into the GeoJSON.
def create_geojson_from_csv(csv_file):
    assert csv_file.is_file()

    features = []

    with open(csv_file, newline='') as f:
        # auto-detect the CSV dialect
        dialect = csv.Sniffer().sniff(f.read())
        f.seek(0)

        # use DictReader which gives a dict for each row
        reader = csv.DictReader(f, dialect=dialect)

        # for each row in the CSV file
        for row in reader:
            row = dict(row)

            lat = float(row['latitude'])
            lon = float(row['longitude'])

            # basic properties
            properties = {
                "title": row['title'],
                "description": row['description'],
                "url": row['url'],
            }

            # if we have an icon from the default set, use it
            if row['icon_default']:
                properties['marker-symbol'] = row['icon_default']

            # if we have a custom icon, use the uploaded marker
            if row['icon_custom']:
                marker_info = get_image_marker_info('marker', row['icon_custom'])
                if marker_info:
                    properties['marker_id'] = marker_info['marker_id']

            # if we have an image, use the uploaded image
            if row['image']:
                image_info = get_image_marker_info('image', row['image'])
                if image_info:
                    properties['image'] = {
                        'id': image_info['image_id'],
                        'w': image_info['width'],
                        'h': image_info['height'],
                        'tip_color': image_info['tip_color'],
                        'avg_color': image_info['avg_color'],
                    }

            # create the GeoJSON for the item
            feature = {
                "type": "Feature",
                "geometry": {"type": "Point", "coordinates": [lon, lat]},
                "properties": properties,
            }
            features.append(feature)

    geojson = {
        "type": "FeatureCollection",
        "features": features,
    }

    return geojson
The core of get_image_marker_info helper function:
def get_image_marker_info(kind, file_name):
    assert kind in {'image', 'marker'}

    if kind == 'image':
        file_path = IMAGES_DIR / file_name
    else:
        file_path = MARKERS_DIR / file_name

    info_json = file_path.parent / f'{file_path.stem}.json'

    with open(info_json) as f:
        return json.load(f)
In the next step, we will call the Update map endpoint with the generated GeoJSON.
Multi-level groups
You can create multi-level groups by using the following format for “group”:
North America/United States/California/Los Angeles
Note, you have to use exactly this / character. Please copy and paste it. It is not the same as the normal / character.
Update map
Step 5: Update the map
Time to call the Update map endpoint with the generated GeoJSON from the previous step.
def update_map(geojson):
    with open(MAP_DATA_JSON) as f:
        map_data = json.load(f)

    url = 'https://maphub.net/api/1/map/update'

    args = {
        'map_id': map_data['id'],
        'geojson': geojson,
        'basemap': 'maphub-light',
        'description': (
            'Sample map for MapHub API tutorial:\n'
            '[Create a map from a table CSV file](https://docs.maphub.net/tutorials/first_map/tutorial.html)\n\n'
            'Texts and images are from visitlondon.com'
        ),
        'visibility': 'public',
    }

    headers = {'Authorization': 'Token ' + API_KEY}

    res = requests.post(url, json=args, headers=headers)
    data = res.json()

    if 'id' not in data:
        print(data['error'])
        return

    print('Map updated')
    print(json.dumps(map_data, indent=2, ensure_ascii=False))
Full script file
Refresh image
Step 6: Refresh static image
Each MapHub map has a static image, which is used in the following places:
- Embed view, before the user clicks the “Play button”.
- The Download / Images links.
- Small thumbnails on “My Maps” page.
Images can be refreshed in two ways:
- Manually, when you save the map in the web interface.
- When using the API, by using the Refresh map image endpoint.
The following function refreshes the map’s image through the API.
def refresh_image():
    with open(MAP_DATA_JSON) as f:
        map_data = json.load(f)

    url = 'https://maphub.net/api/1/map/refresh_image'

    args = {
        'map_id': map_data['id'],
    }

    headers = {'Authorization': 'Token ' + API_KEY}

    res = requests.post(url, json=args, headers=headers)
    data = res.json()

    if 'id' not in data:
        print(data['error'])
        return

    print(data['message'])
Full script file
Creating your first map
In this tutorial, we’ll create a new map, search for a place and save it to your My Maps folder.
-
Go to MapHub.net
-
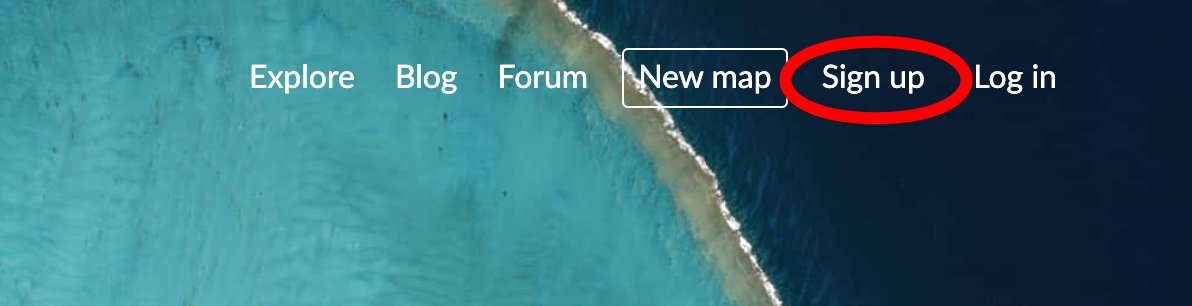
If you haven’t registered yet, in the top right corner select Sign up. Register with your chosen username and check your email to verify your account.
-
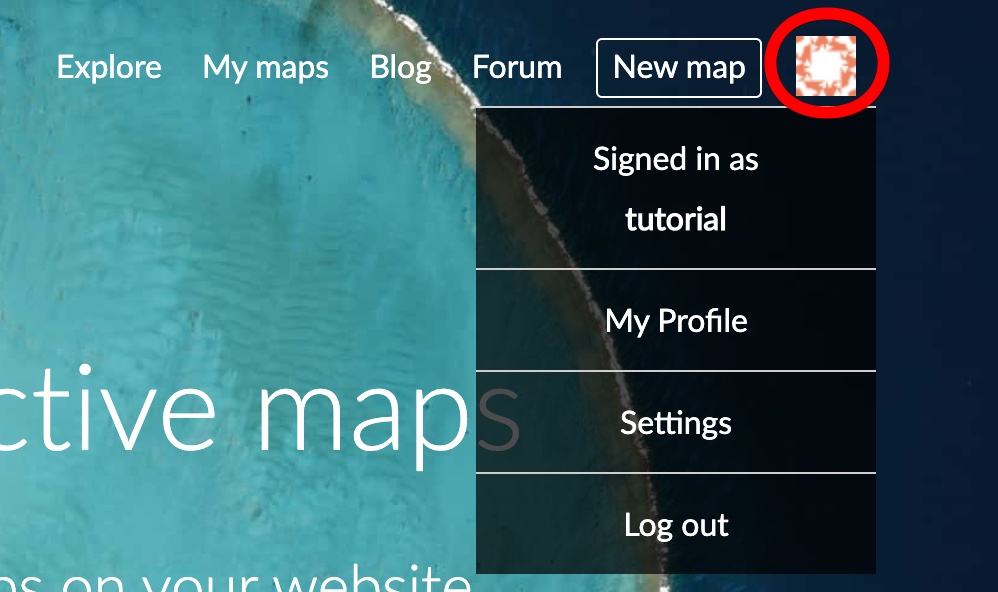
You can see you are logged in from the top right corner’s icon. That opens your personal menu.
-
Click on the New Map button, to create a new map.
-
Use the Search icon to search for an interesting place. After typing the name and press the
Enterkey to search.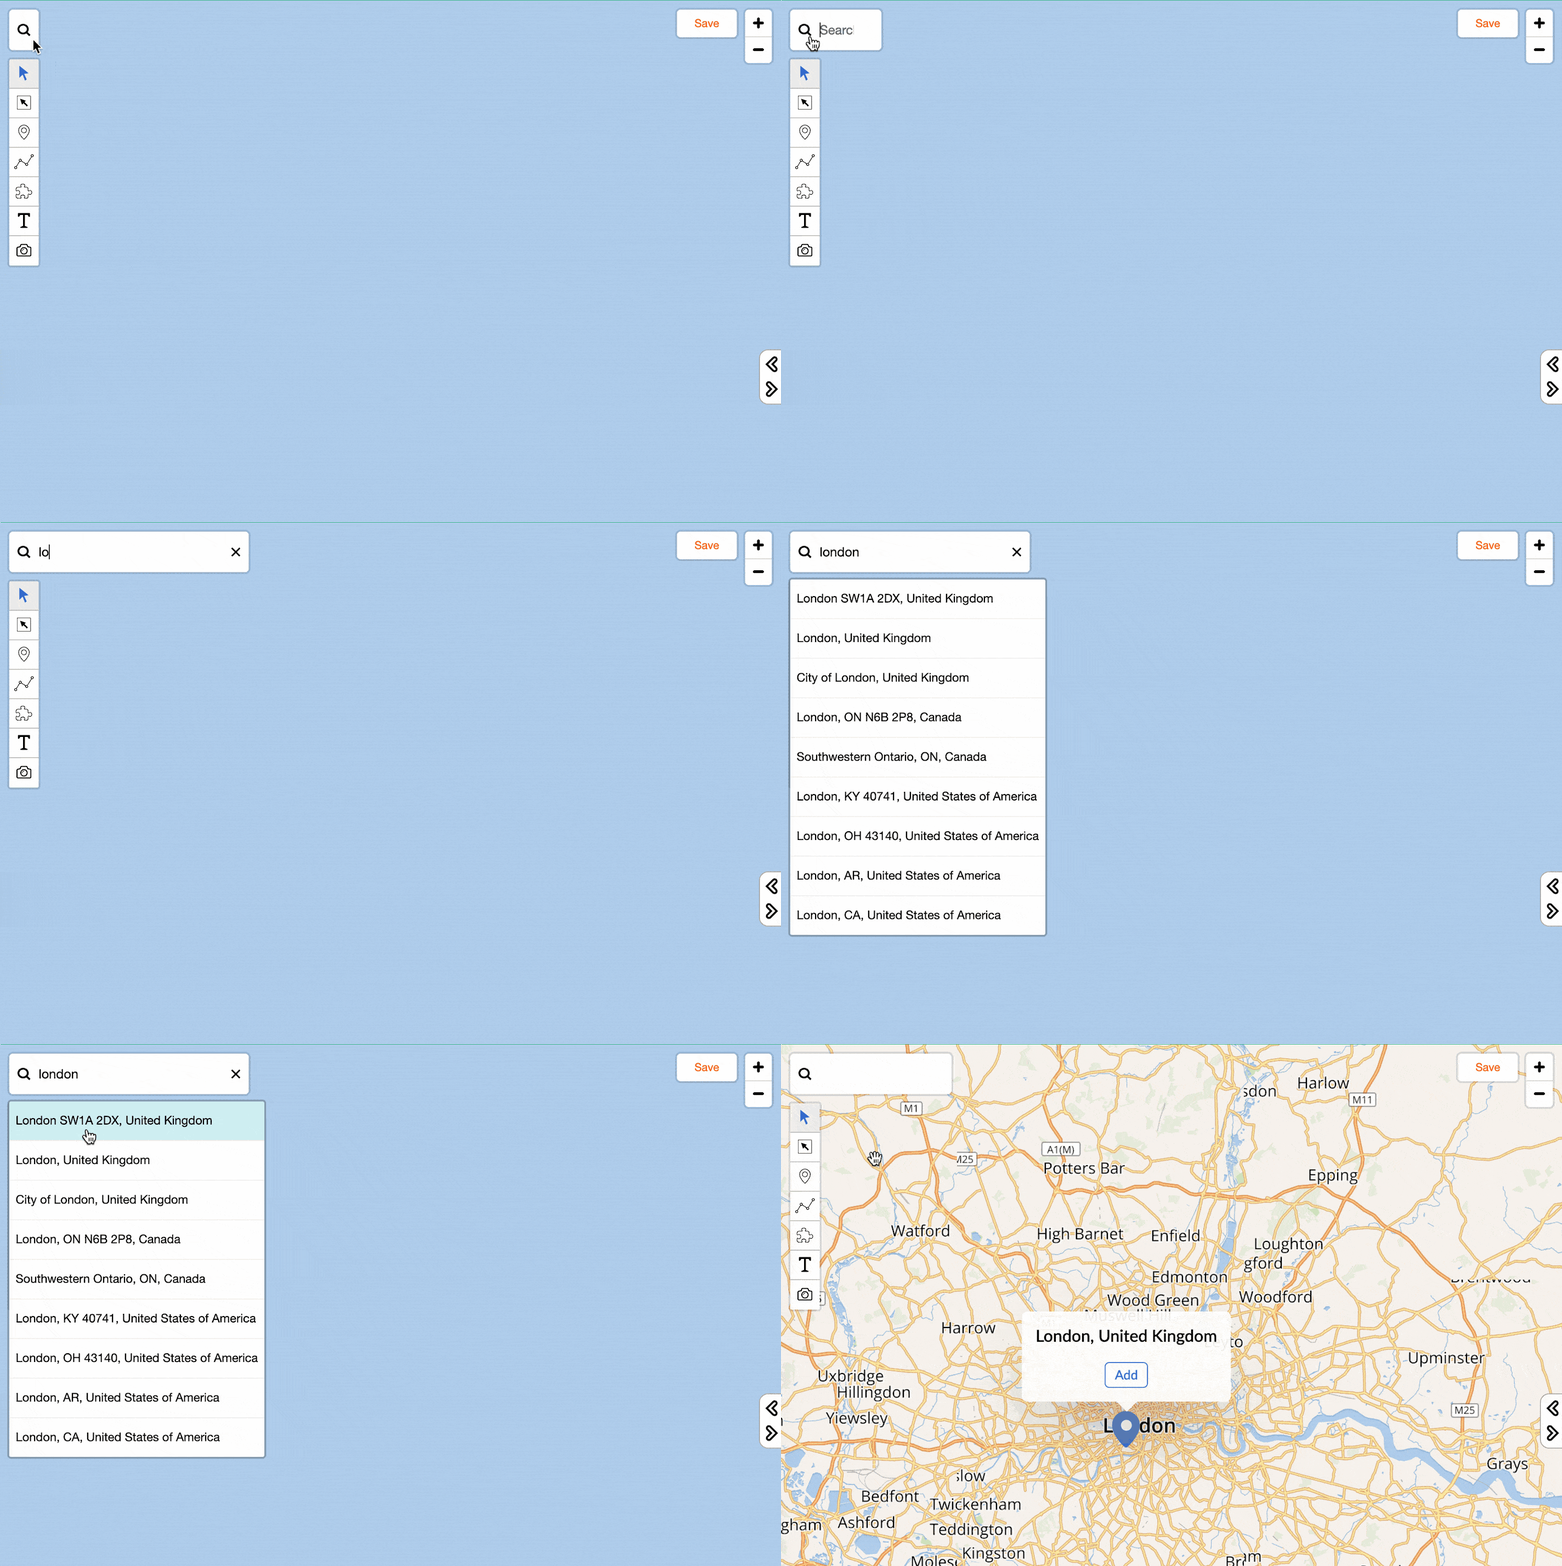
-
Click Add to save the item on your map.
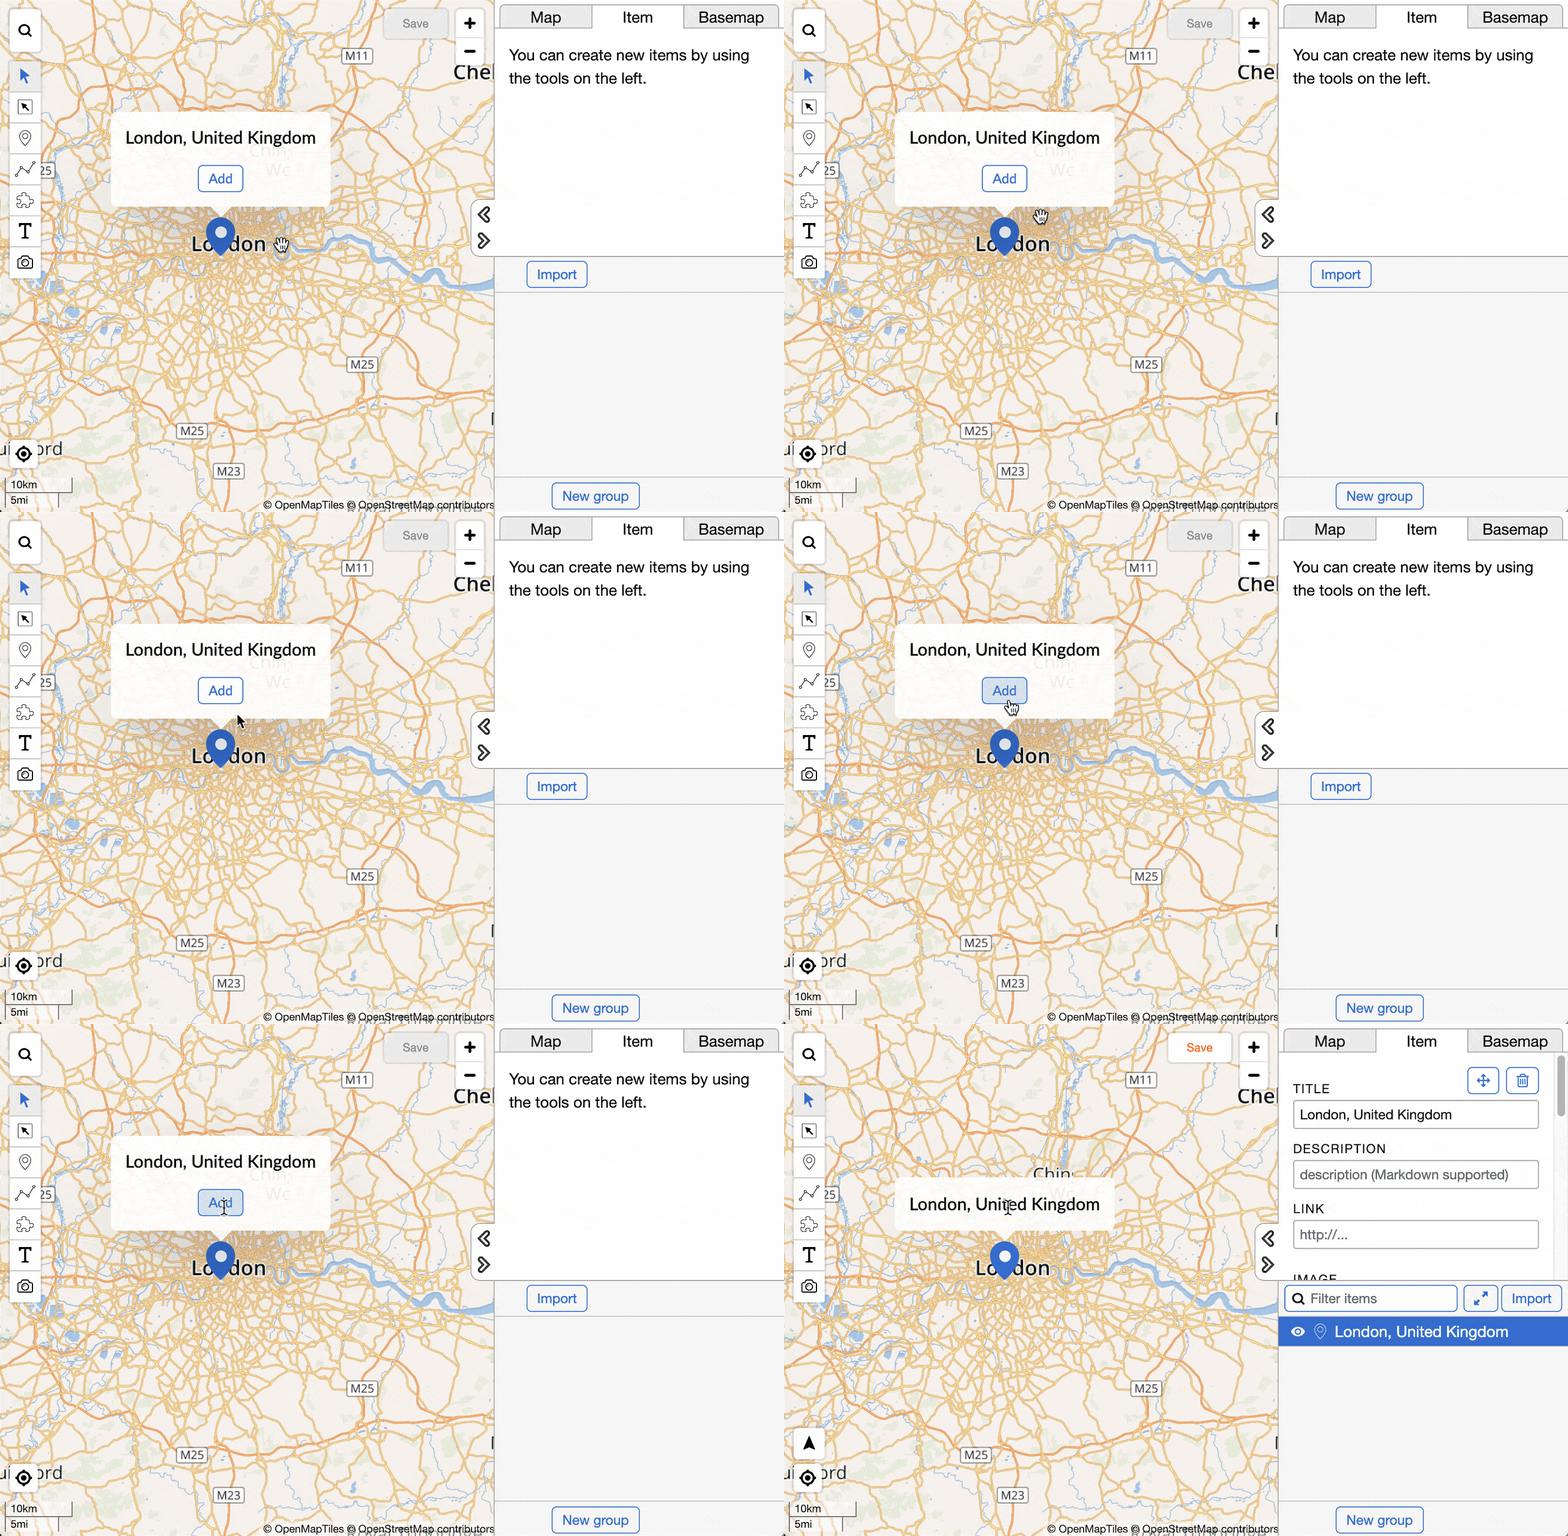
-
Click on the Map tab, give a Title to your map and save it.
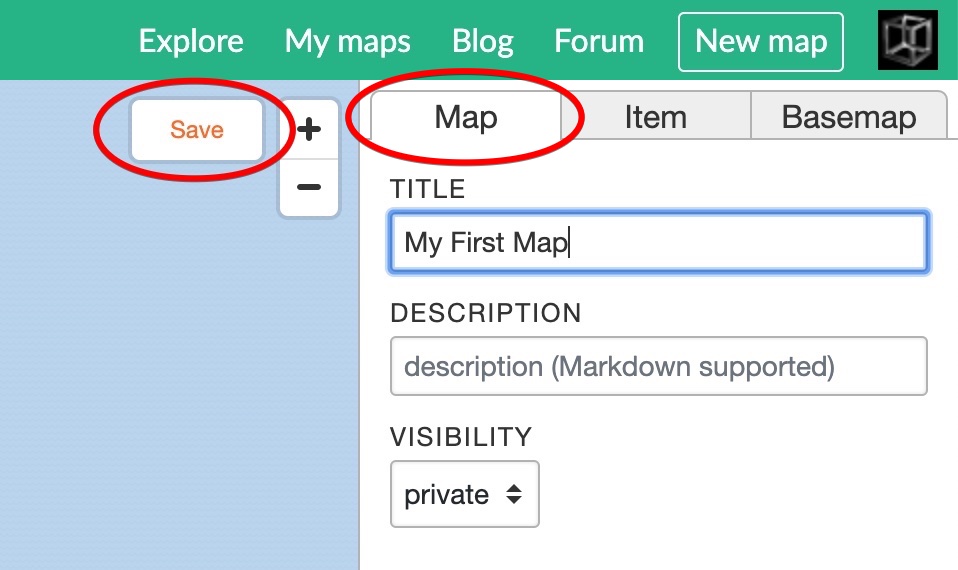
-
After saving the map, the map gets a unique URL on MapHub.net, you can see it in the browser’s location bar. Using this link, later you will be able to share your map if you decide to set the visibility to “public”.

-
You can access all your saved maps by clicking the My Maps button in the top bar.
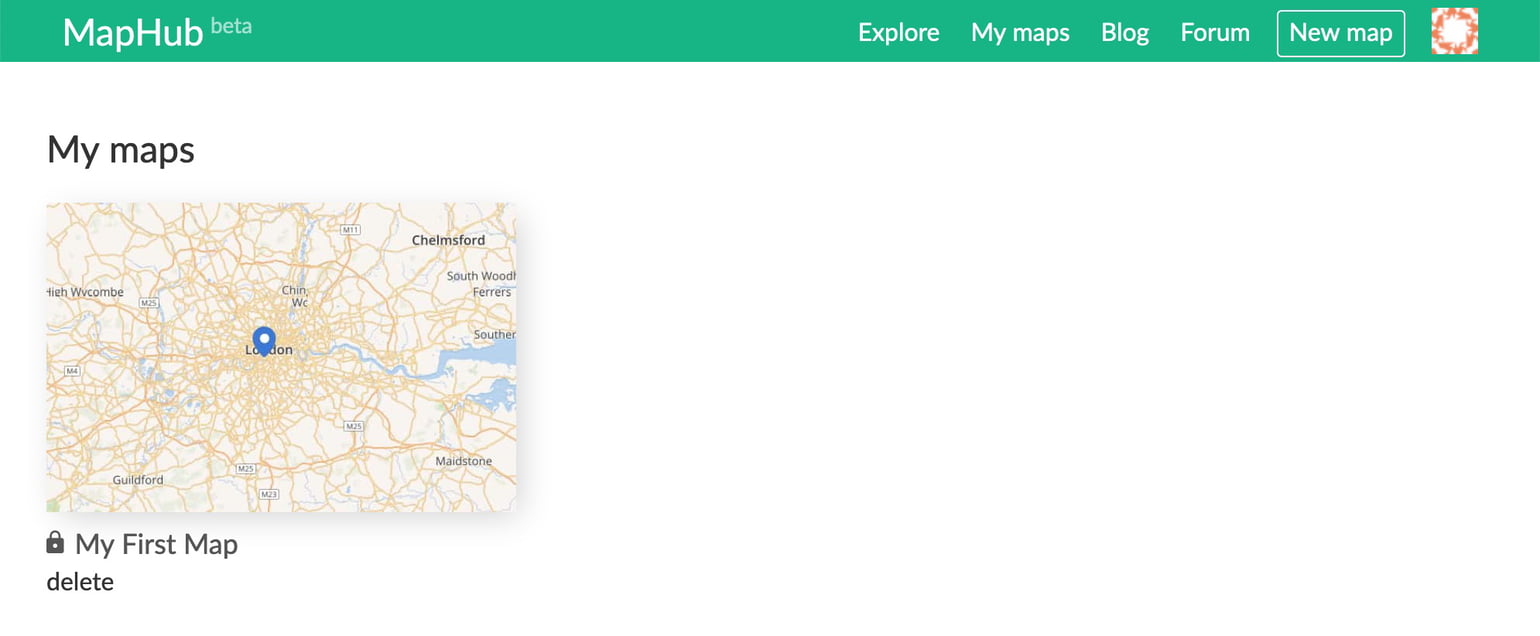
Congratulations, you’ve created your first map!
Adding interactive maps to a Wix website
MapHub allows you to create interactive maps, which you can then embed on a Wix website. Here is a short tutorial for it.
-
First, create a MapHub map. If you haven’t already, you can easily do it on this link: https://maphub.net/map
-
Once you’ve saved your map, you’ll see the the “Embed on Website” button on the right side.
-
On Wix.com, click “Add Elements”.

-
Select Embed code / Popular Embeds / Embed HTML.

-
Select code, and paste the “iframe” code which was generated in MapHub.
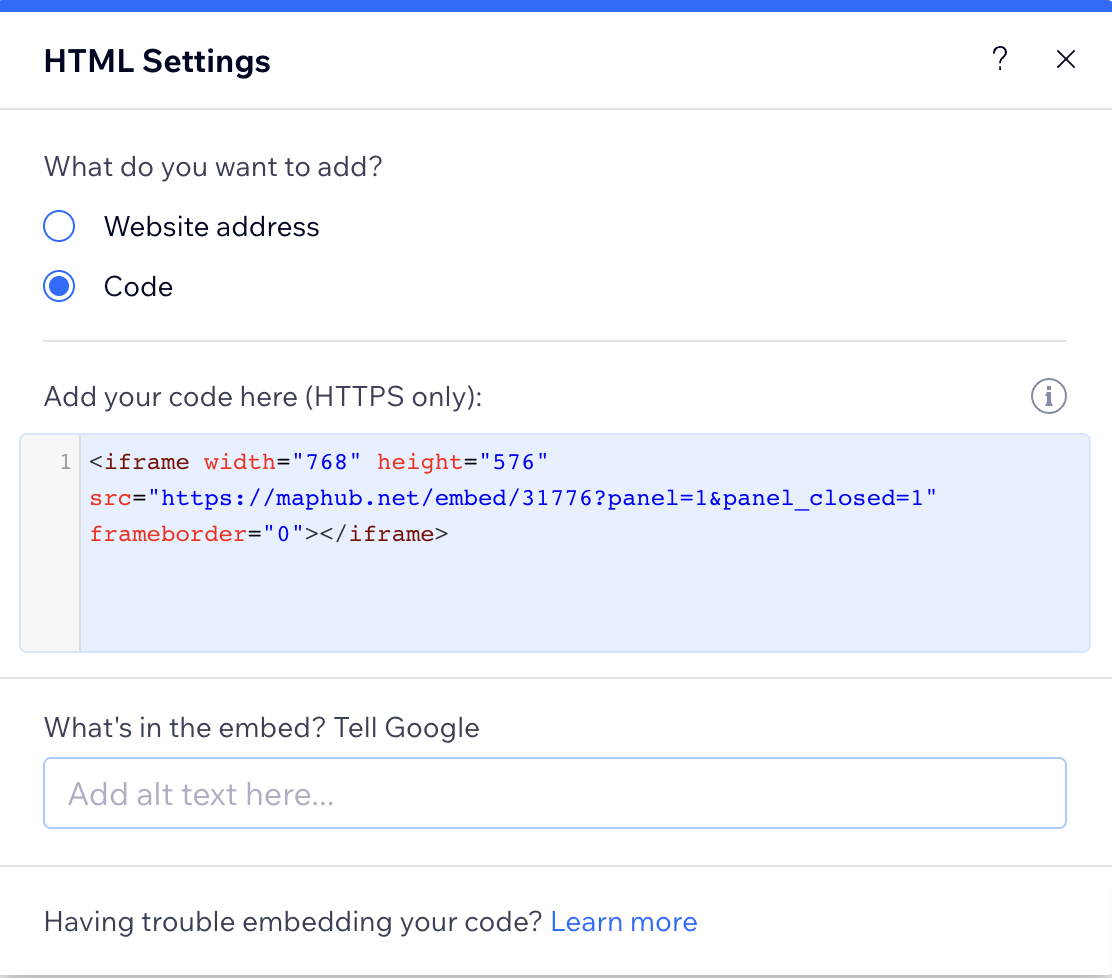
-
For the best results on Wix.com, edit the width and height values and change them to “100%”. This allows the Wix editor to set the sizes correctly.
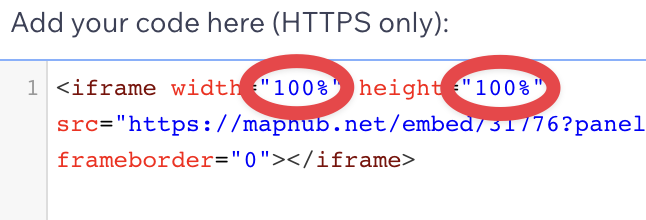
-
You are done, you have embedded an interactive MapHub map into Wix.com:
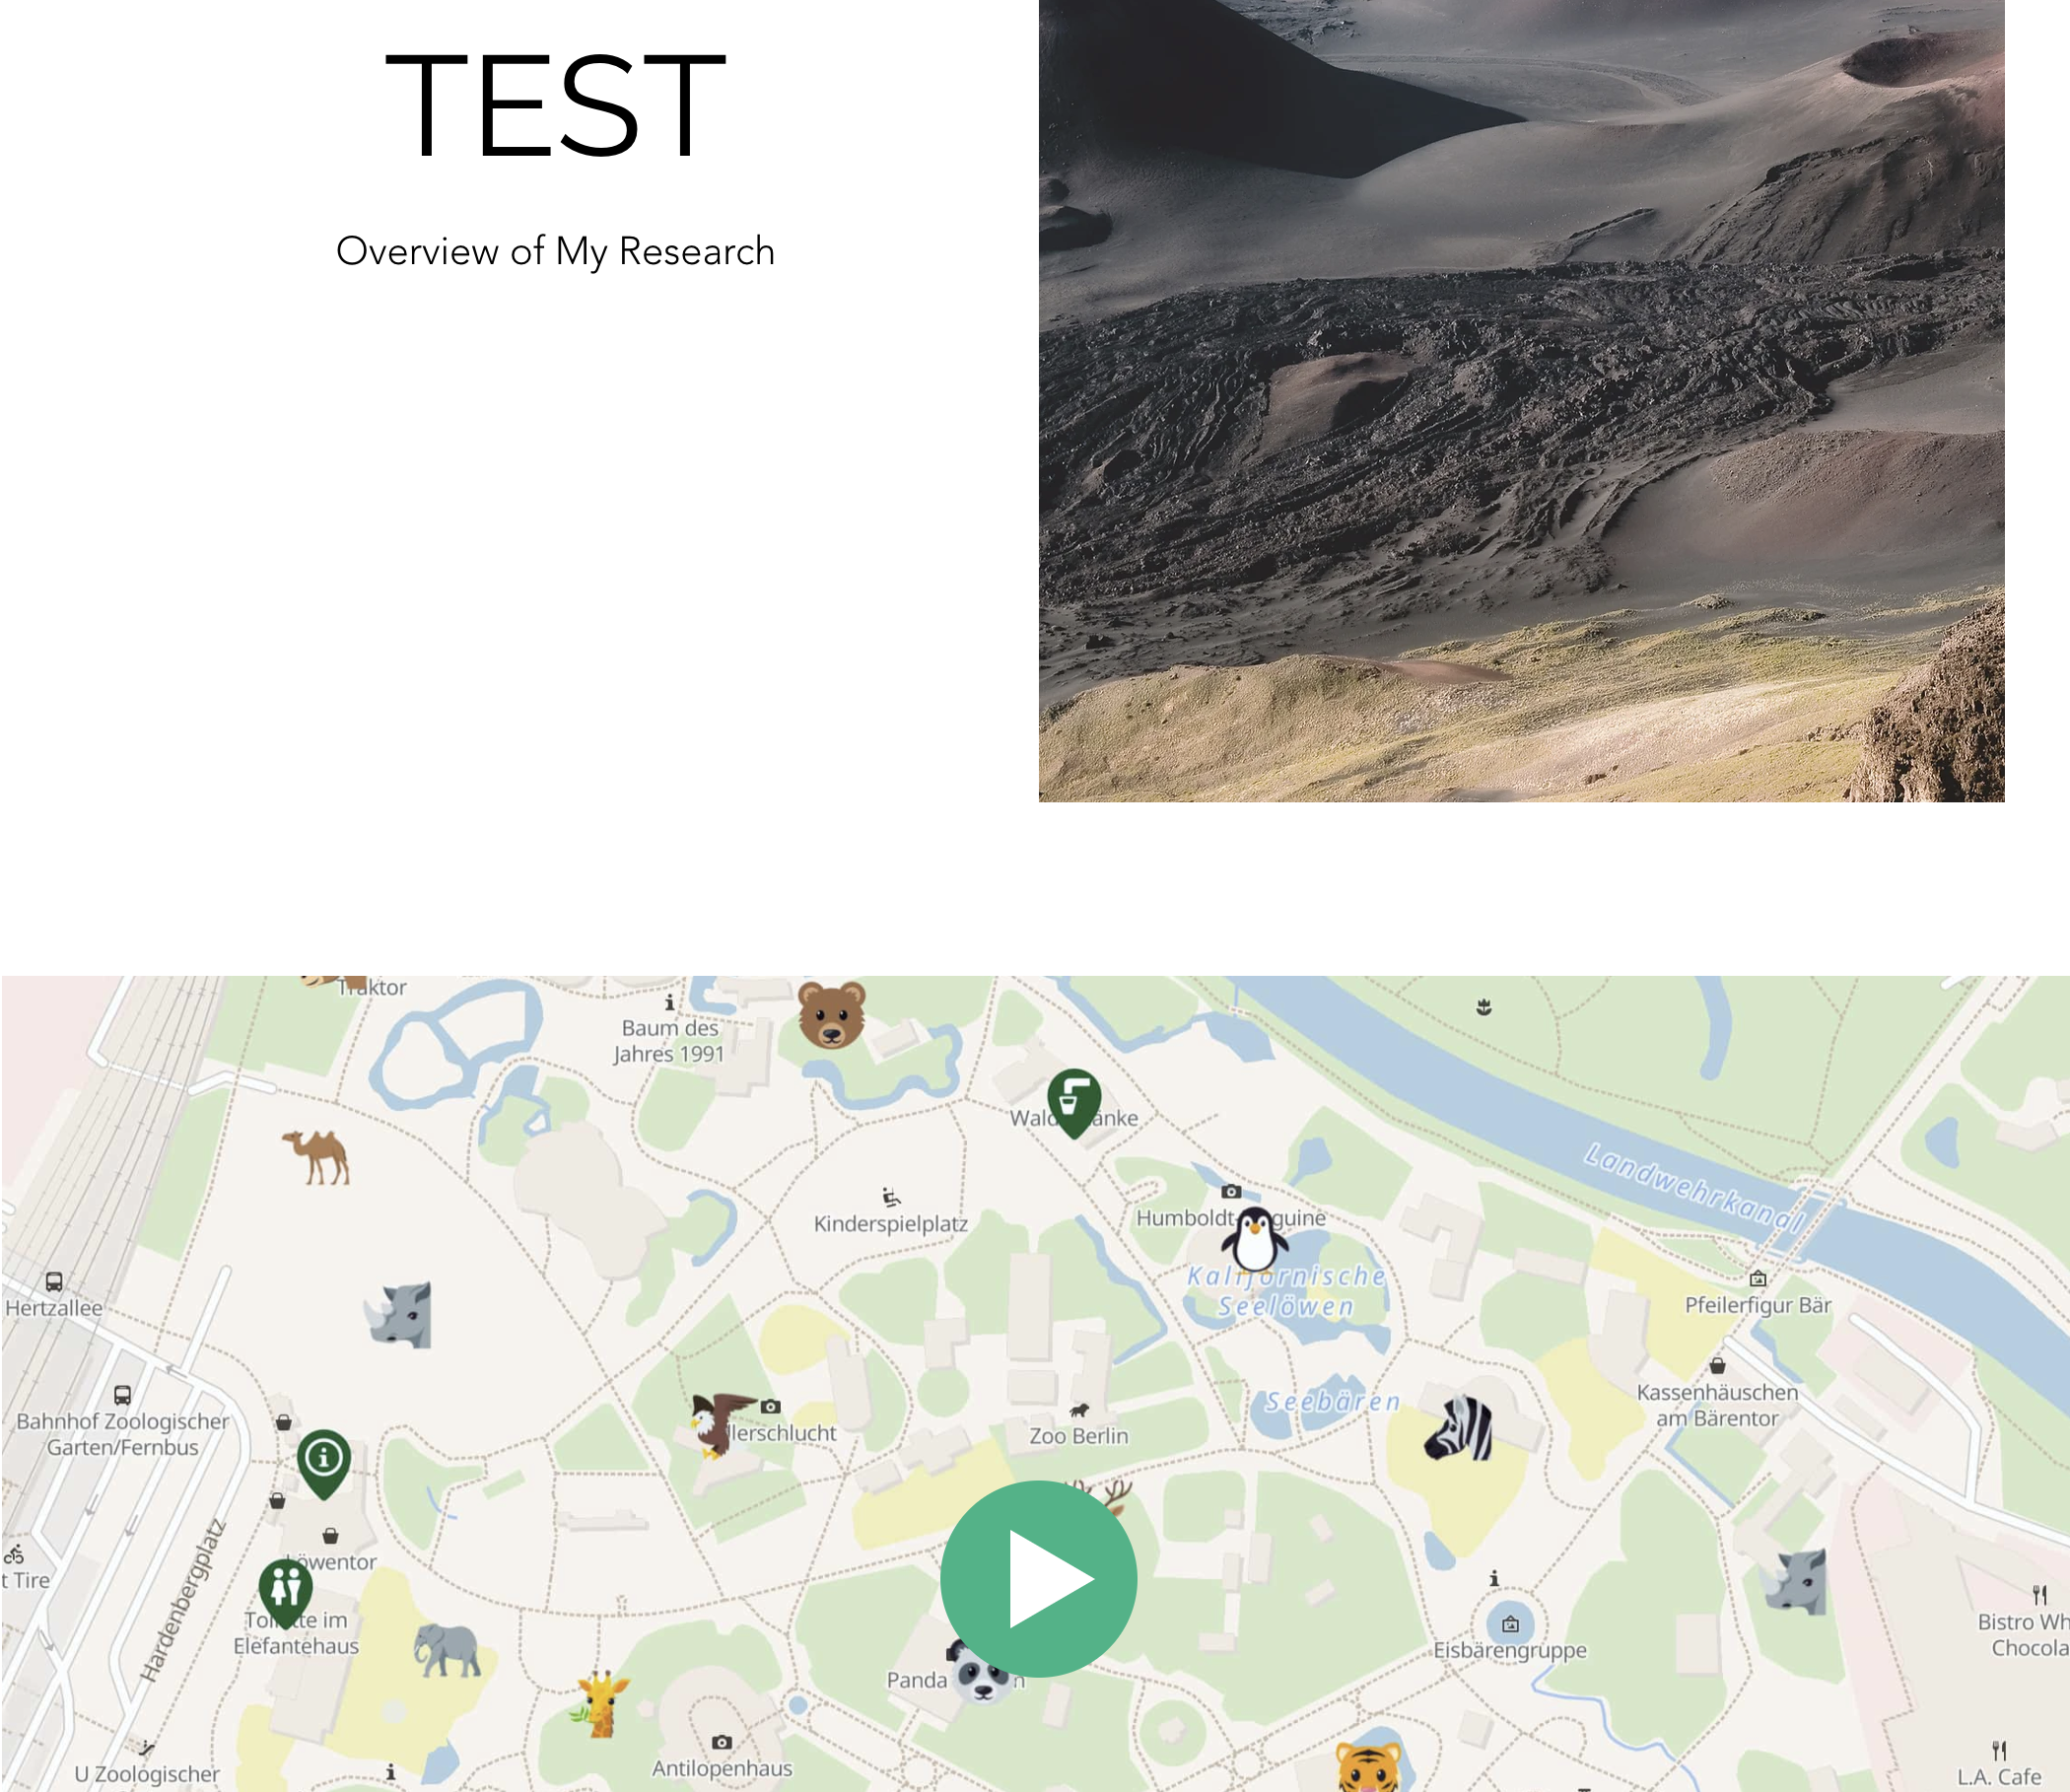
Drawing tools in MapHub
This tutorial will introduce you to the different drawing tools in MapHub.
It starts where “Creating your first map” tutorial finished. If you haven’t done it yet, we recommend you to do it first.
-
Click My Maps and load the map you’ve saved previously, by clicking on it.
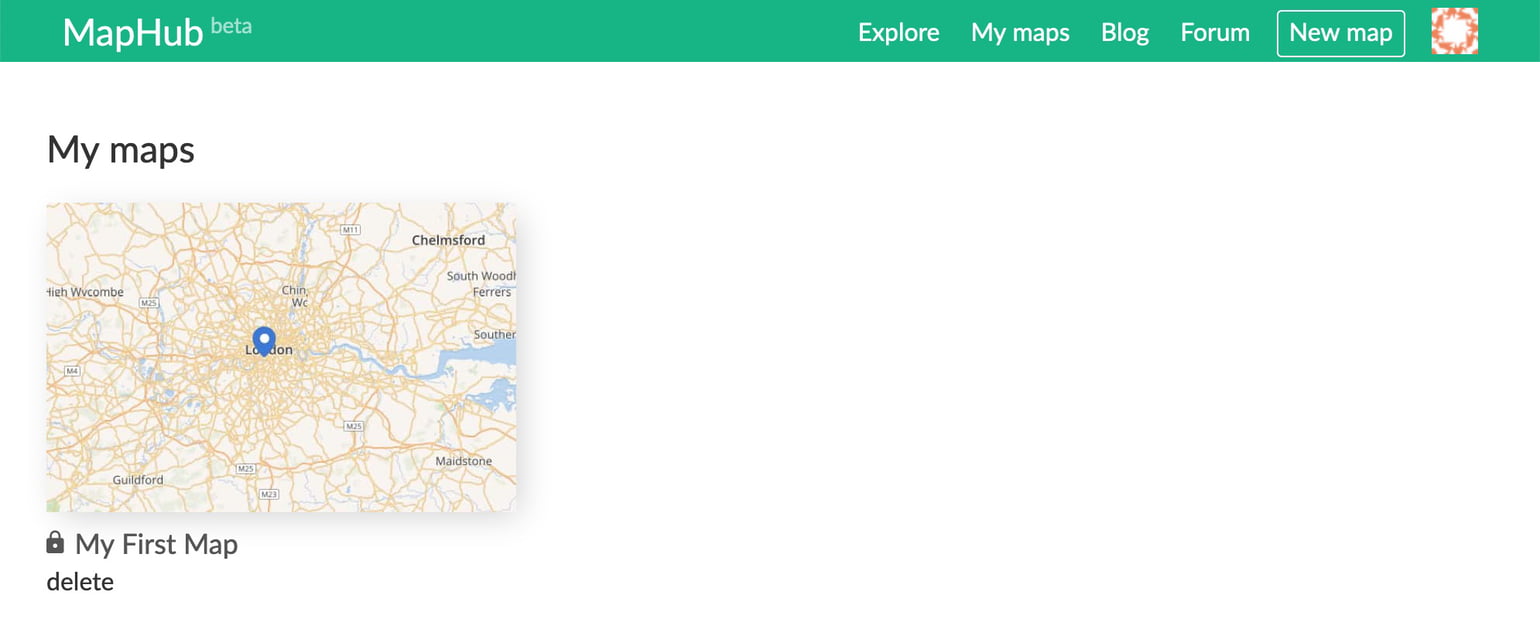
-
Once the map loads, you can see the drawing tools on the left side of the map.

Point tool
The point tool allows you to create new points (or markers).
-
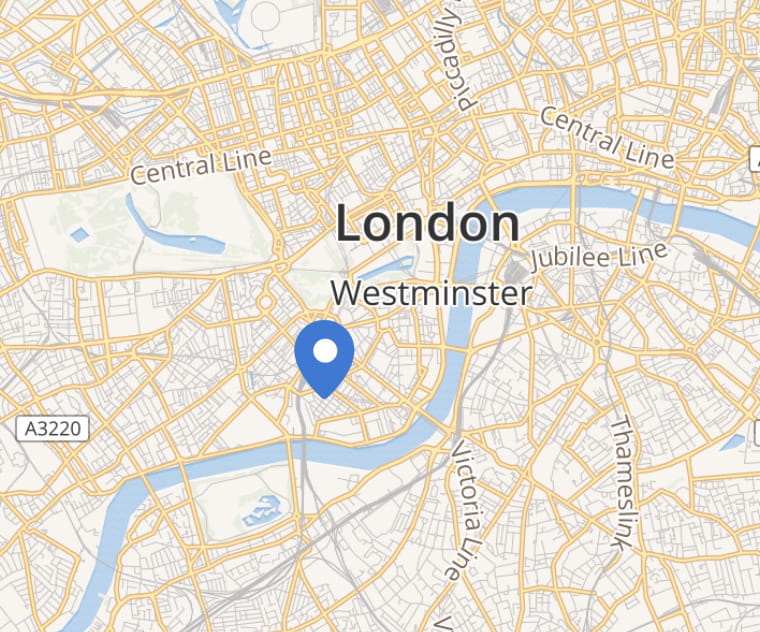
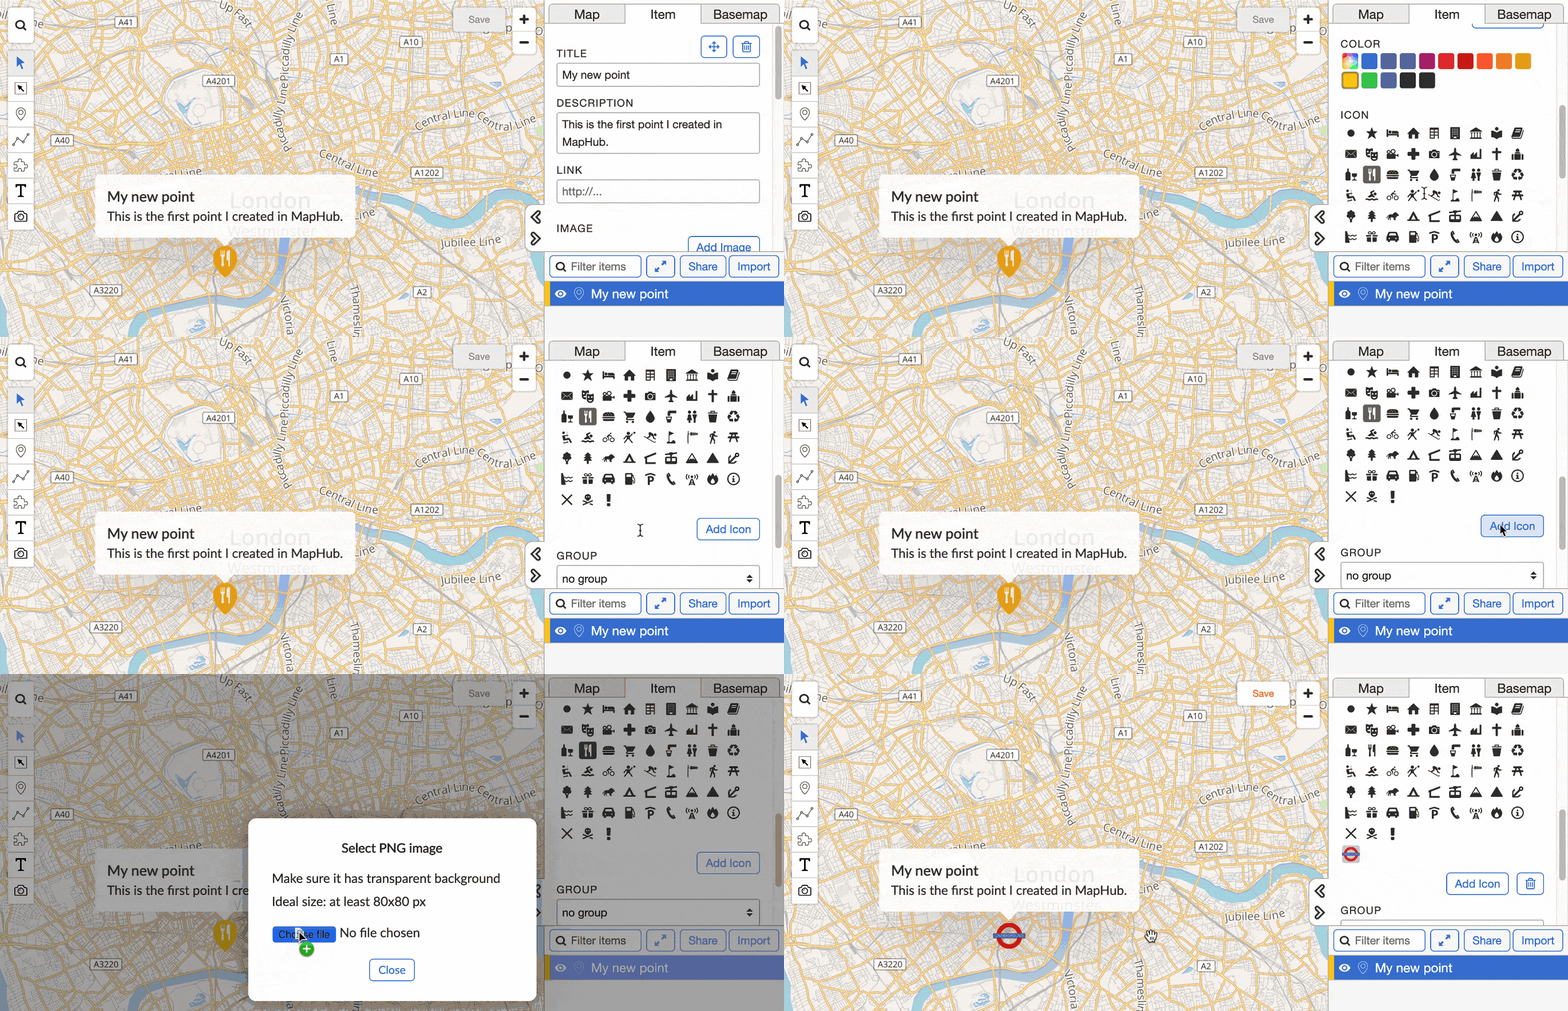
Select the point tool and click somewhere on the map. Once added, these points are shown with a blue icon by default.
-
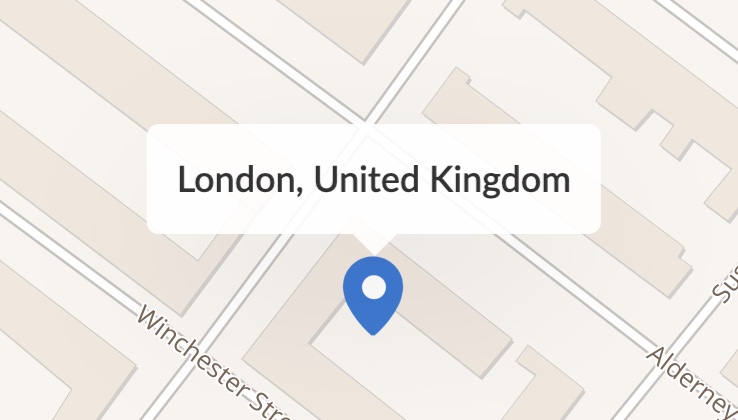
You’ll also see a popup appearing.
-
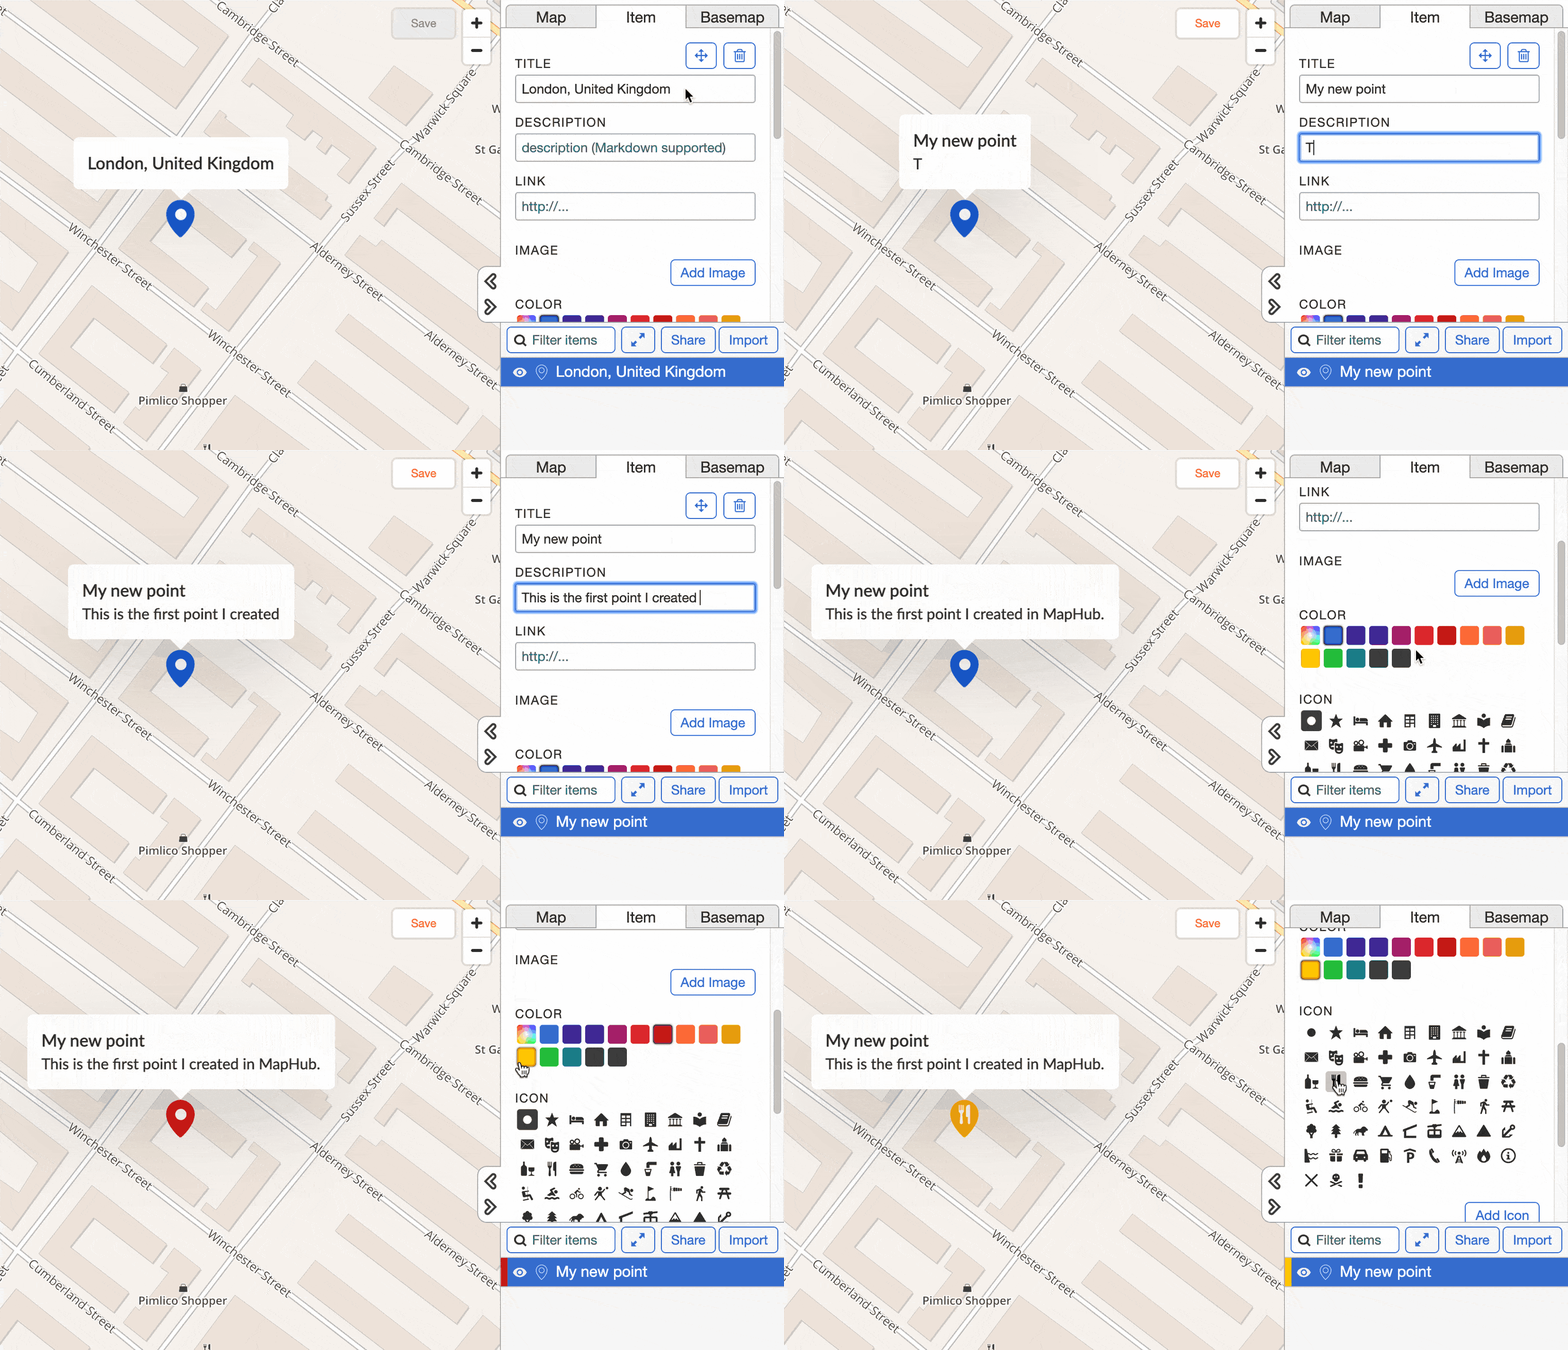
Have a look at the right side Item menu. Using the Title and Description fields, you can customize the display of the popup. Scroll down, and you can customize the Color and Icon as well.
-
You can also upload a custom PNG file for the icon. Make sure to use one with a transparent background.
-
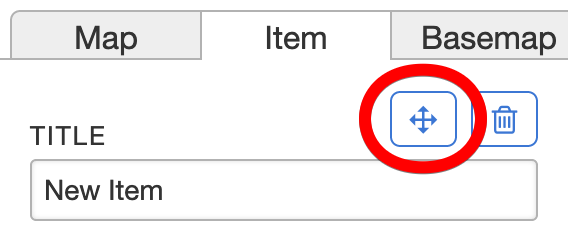
If you would like to move a point, click the move icon.
-
If you would like to delete a point, click the delete icon or press the
Del/Backspacekey.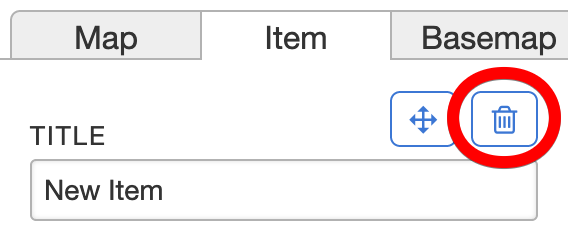
Line tool
The line tool allows you to create simple or complex lines.

-
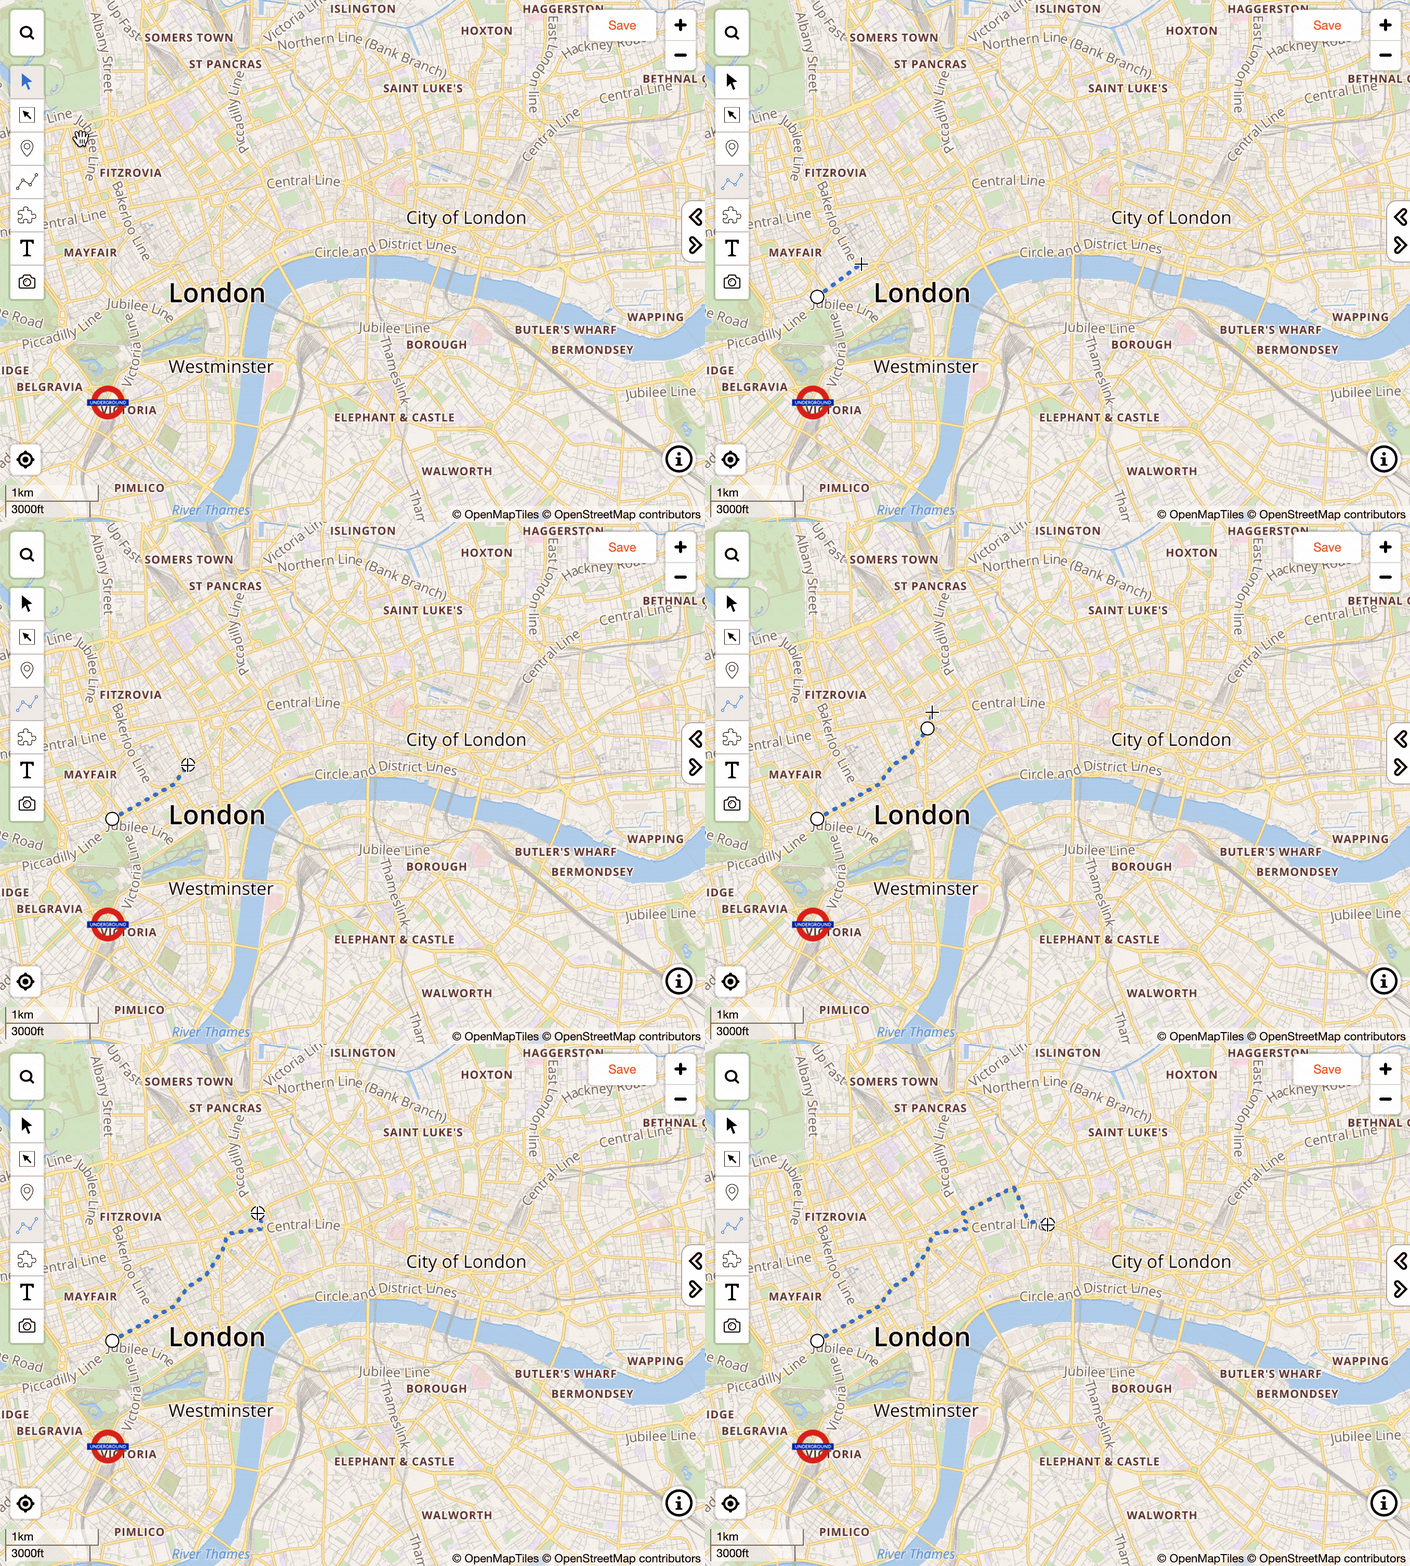
Select the line tool and click somewhere on the map to start drawing a new line. The map goes in a “line drawing” mode.
-
You can finish drawing by clicking on the last point, or by pressing the
EnterorEsckey.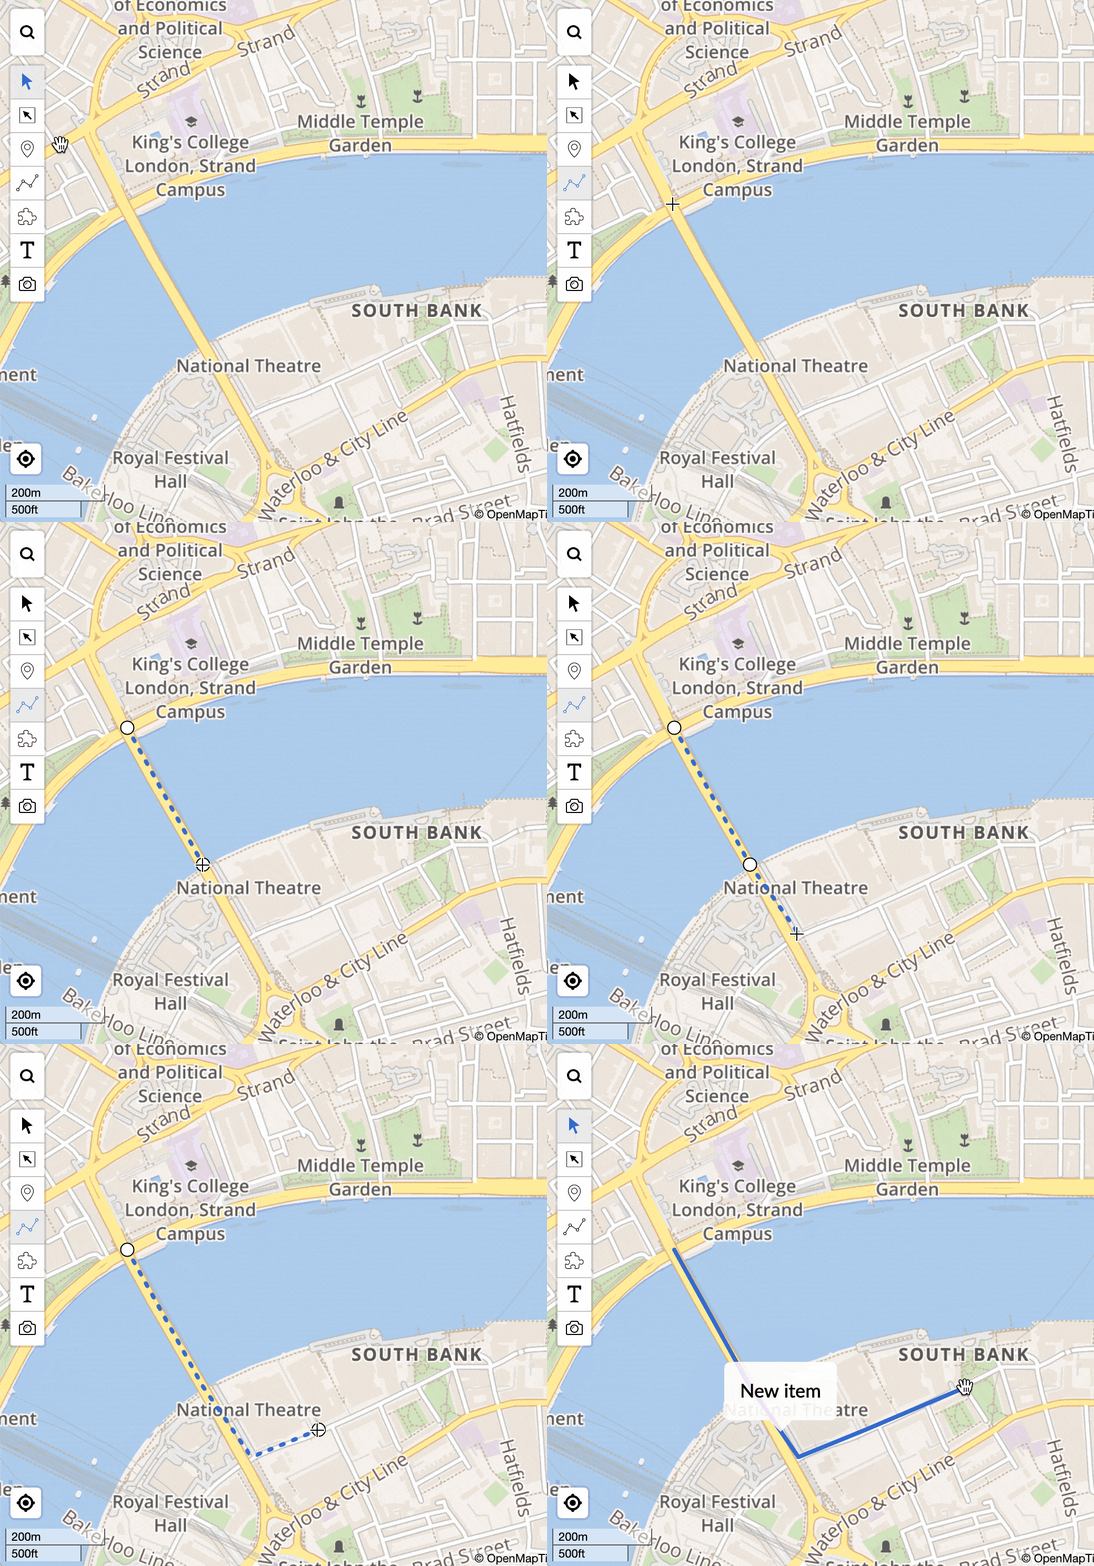
-
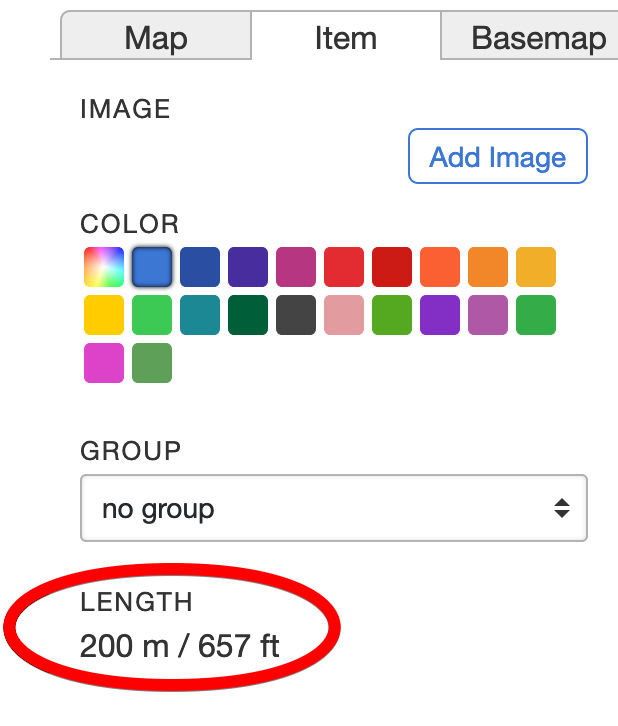
In the right-side panel, you can change the color of the line and see the Length, calculated across all segments.
Editing existing lines
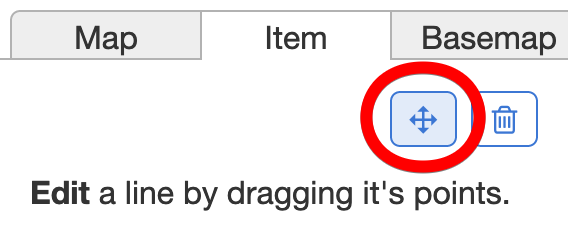
By clicking on an existing line, you can go to Edit mode by clicking on the following button:
-
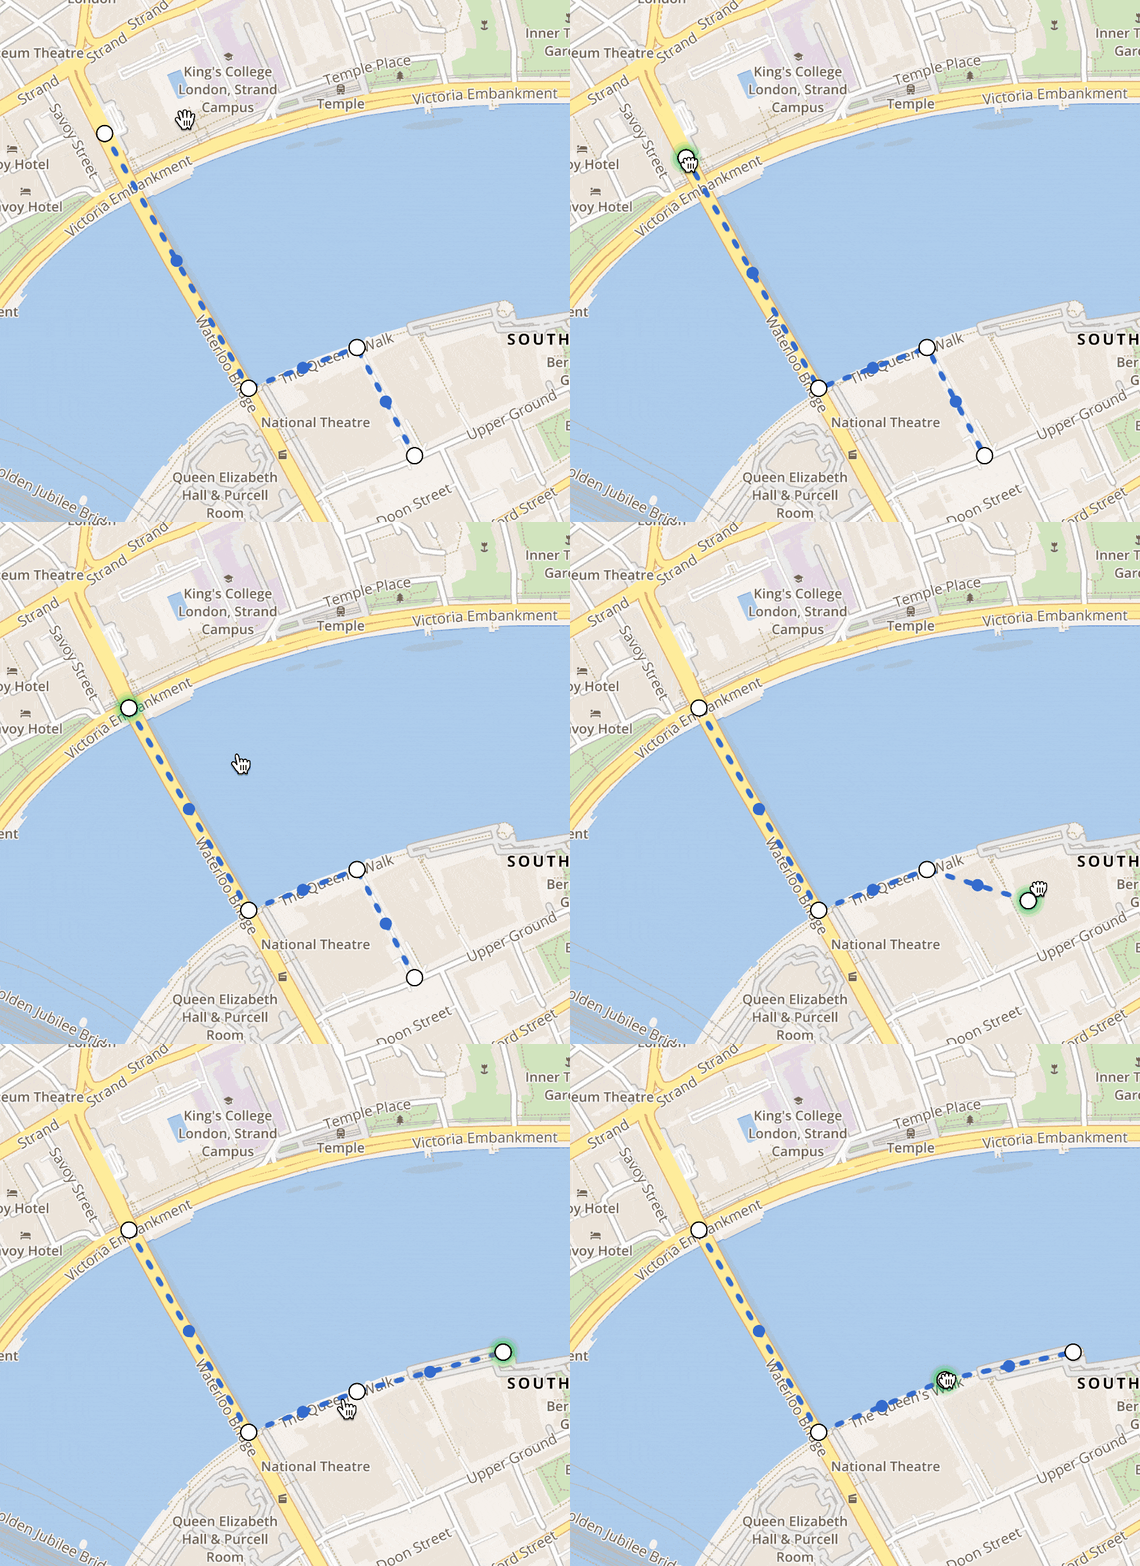
Editing existing points of a line can be done by dragging the white circles.
-
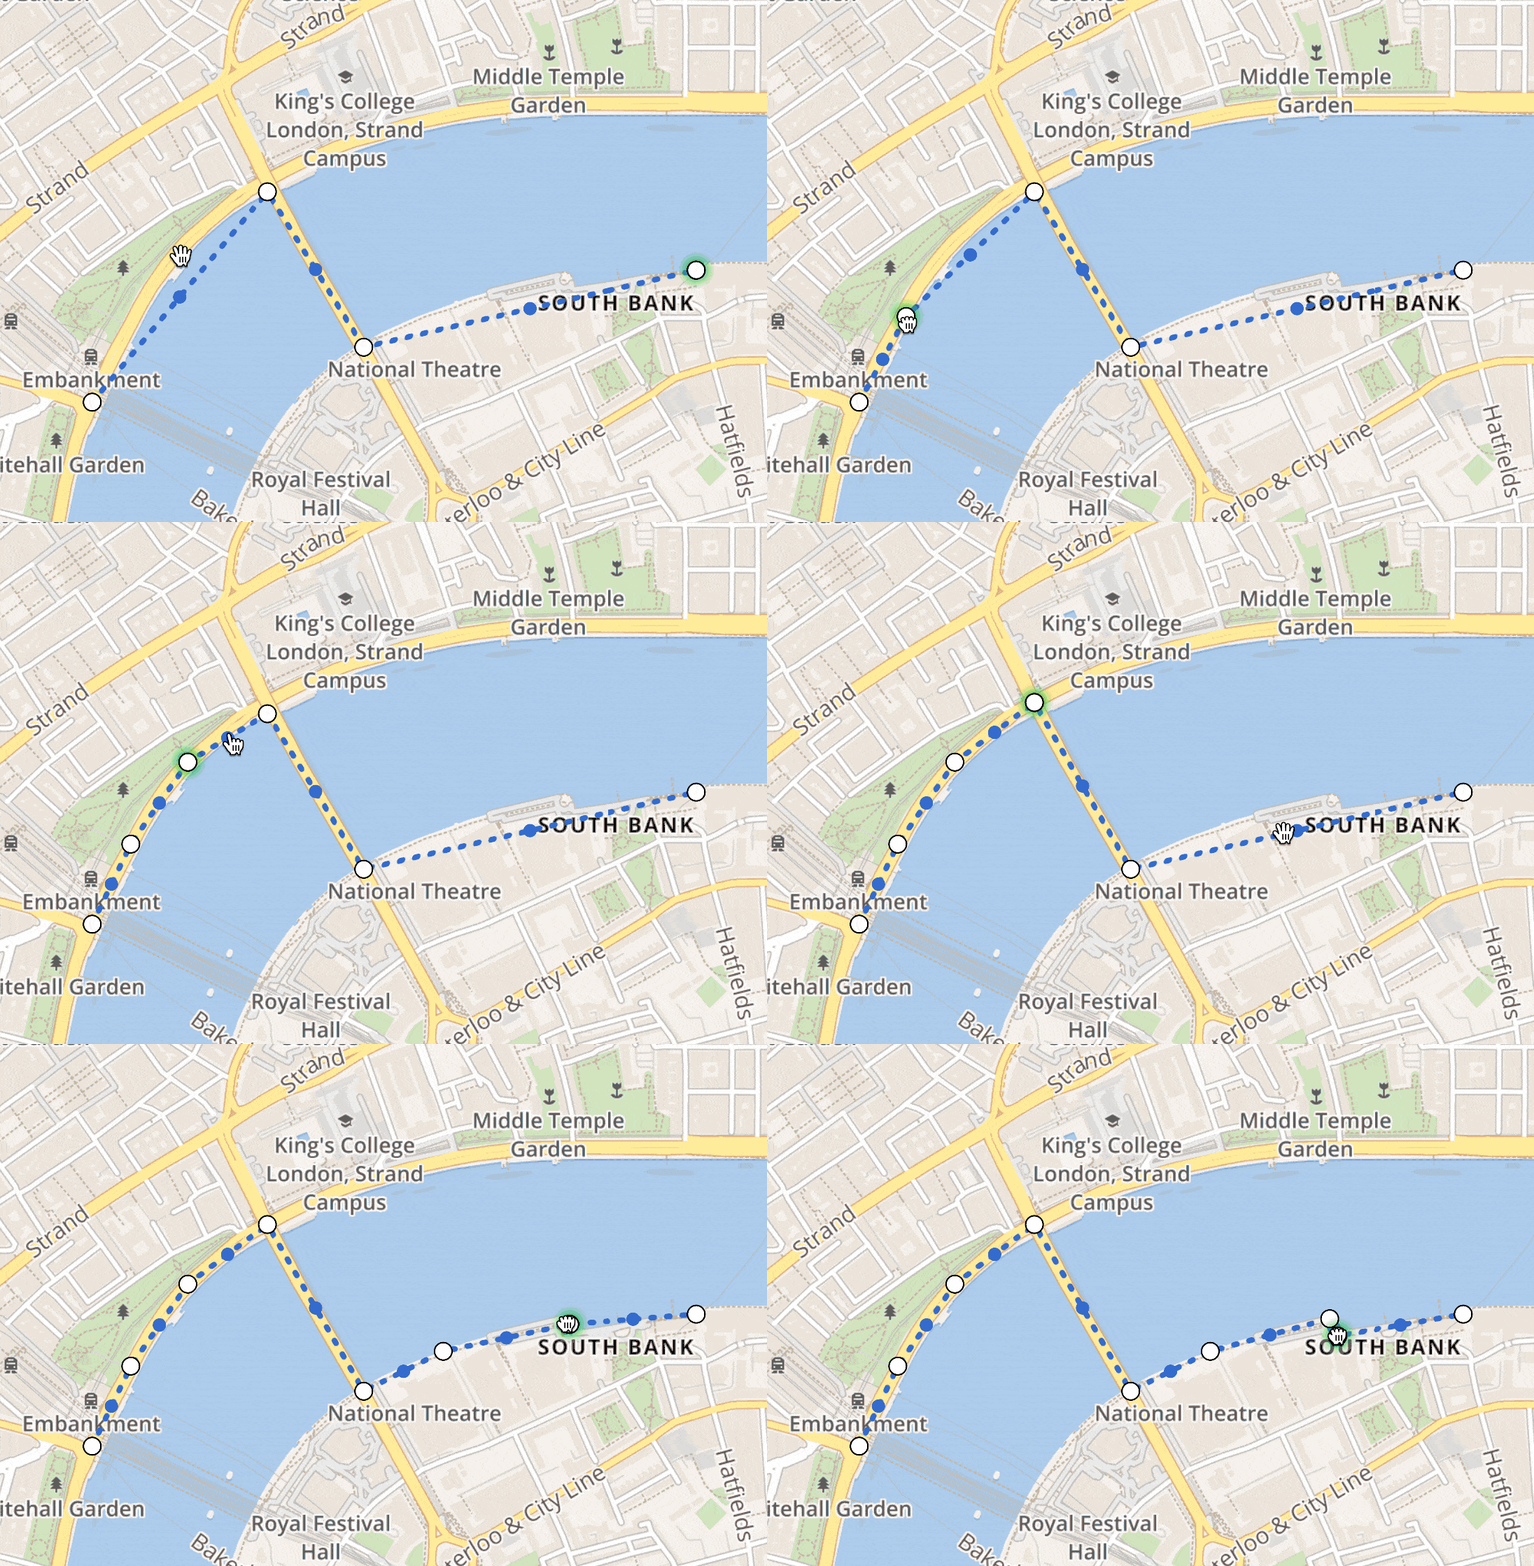
Adding new points between existing points can be done by clicking on the smaller blue circles and dragging them.
-
You can add points at the ends of the line, by Ctrl / Cmd clicking on the endpoints. In this mode, you can finish editing by clicking on the last point twice, or by pressing the
EnterorEsckey.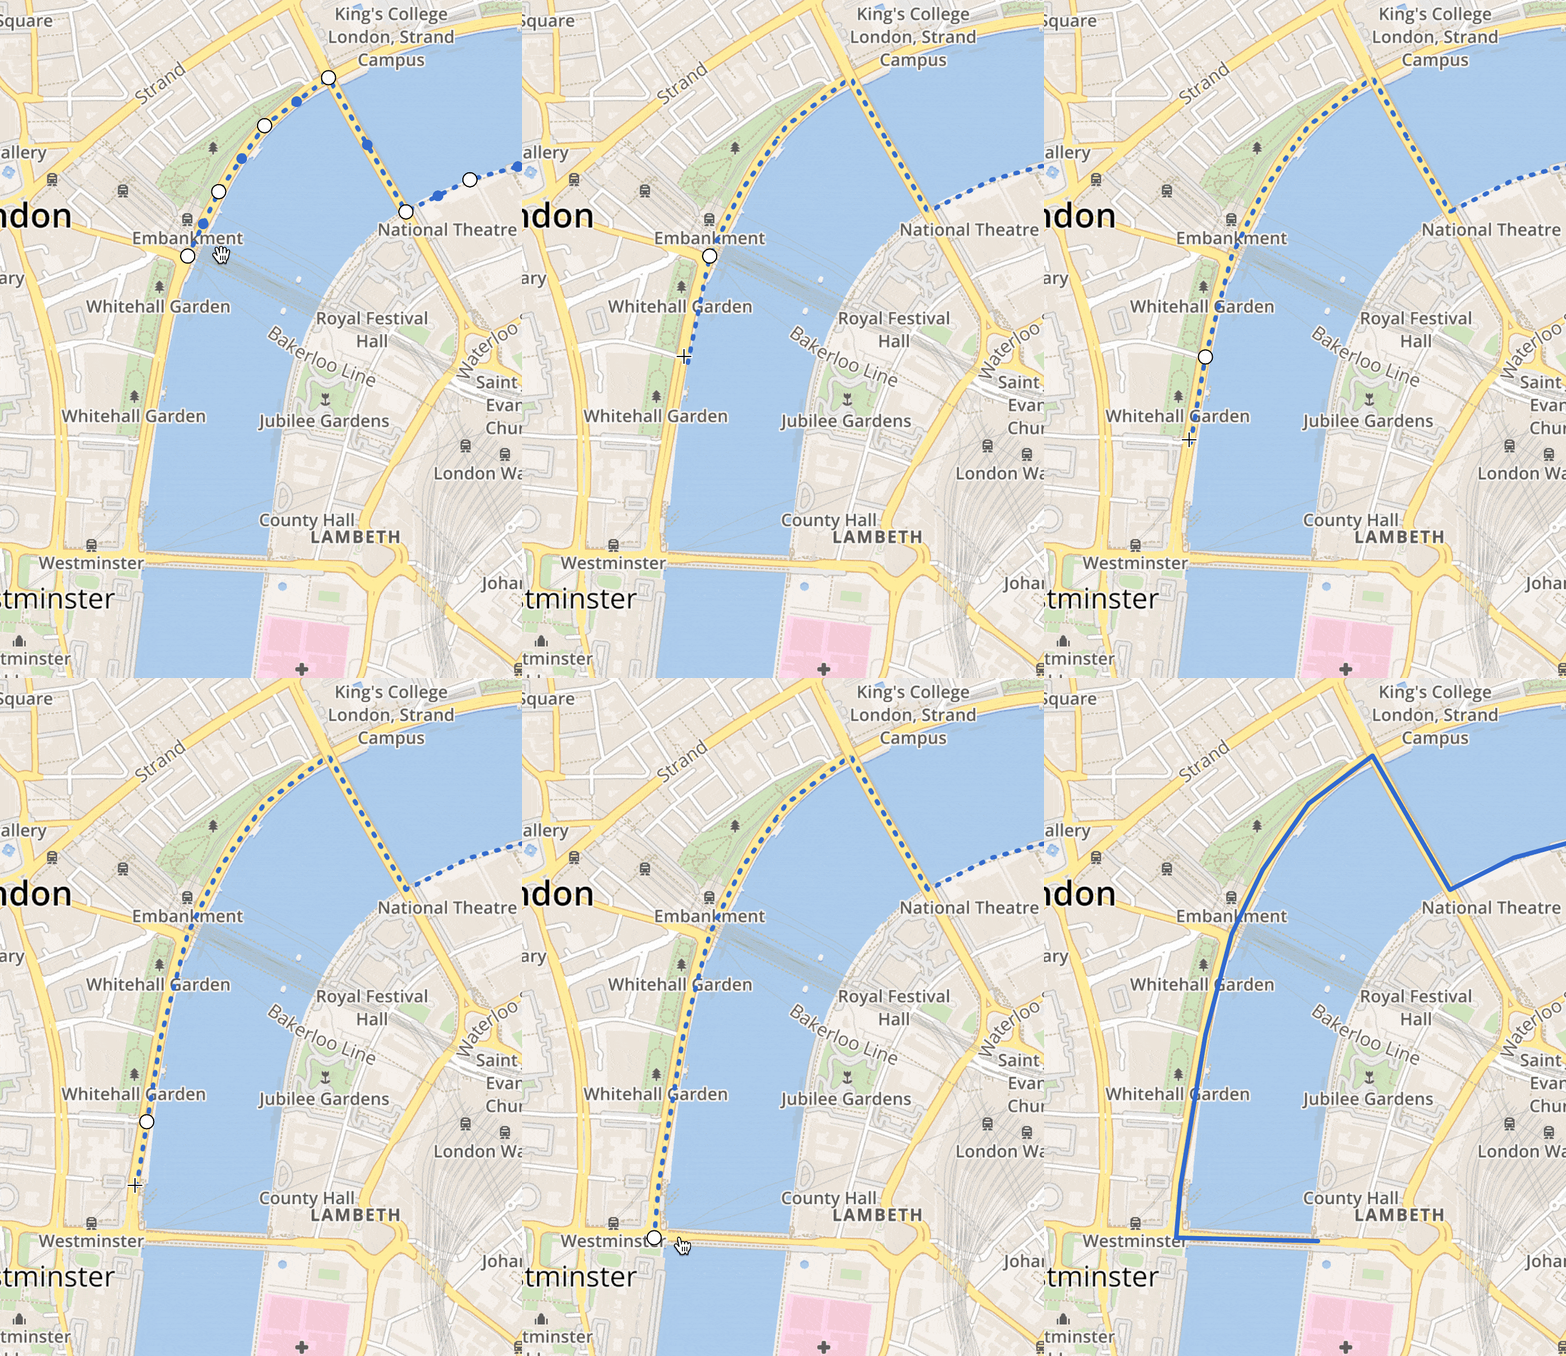
-
To delete points within a line, you need to click on a white circle (it displays as a green outline), and then press the
Del/Backspacekey, or the Delete icon in the right-side panel.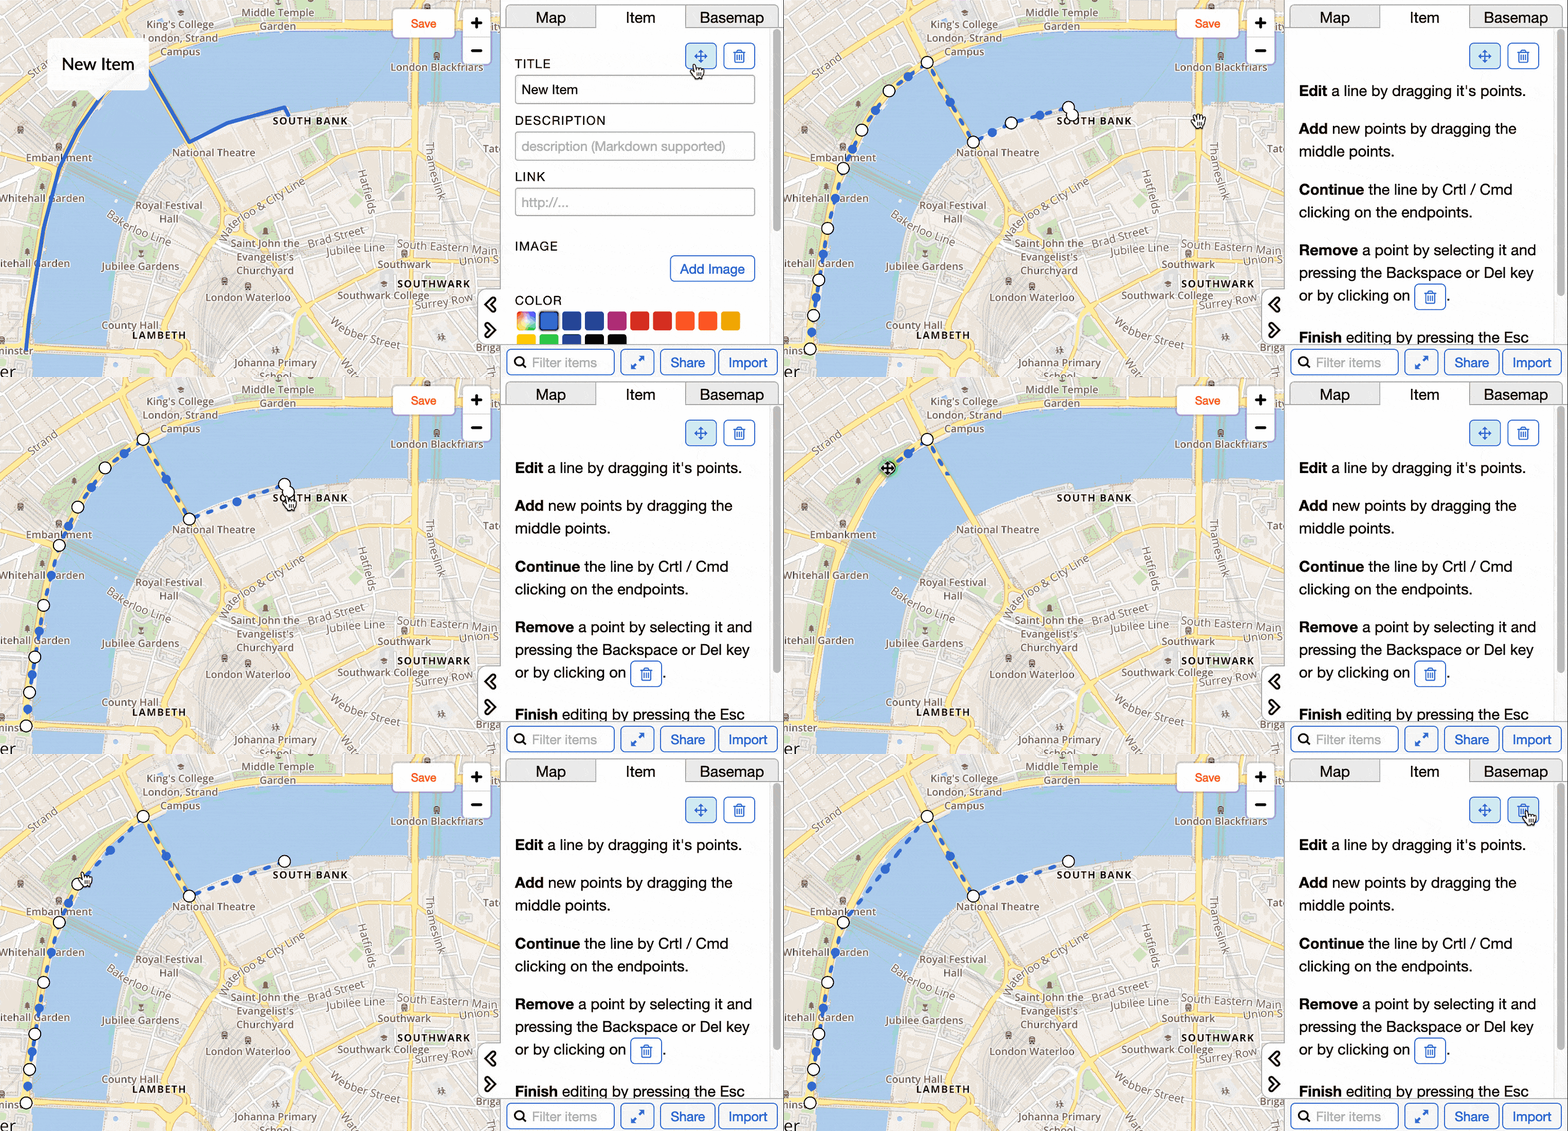
You can exit the line editing mode by clicking on the Edit mode button, or pressing the Enter or Esc key.
Converting street addresses to lat-lon coordinates using Google Earth
-
First step, you’ll need the Desktop version of Google Earth Pro app. Go to this link and click “Download Earth Pro on desktop”. Download and install it.
-
If your table is in XLSX format, you need to save it as CSV first.
-
Open Google Earth Pro and select File / Import. Select your CSV file.
-
On the first screen, the defaults are usually OK. If not, adjust until the columns are nicely separated. Click Next.
-
On the next screen, select “This dataset does not contain lat/lon information…”. Click Next.
-
On the next screen, choose which option describes your address format better.
-
On the last screen, you can keep the defaults and click Finish.
-
If there is any mistake, it’ll ask you to fix the results.
-
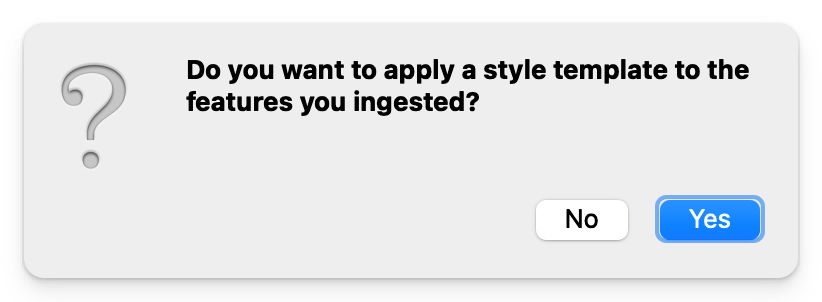
When asked about style template, click No:
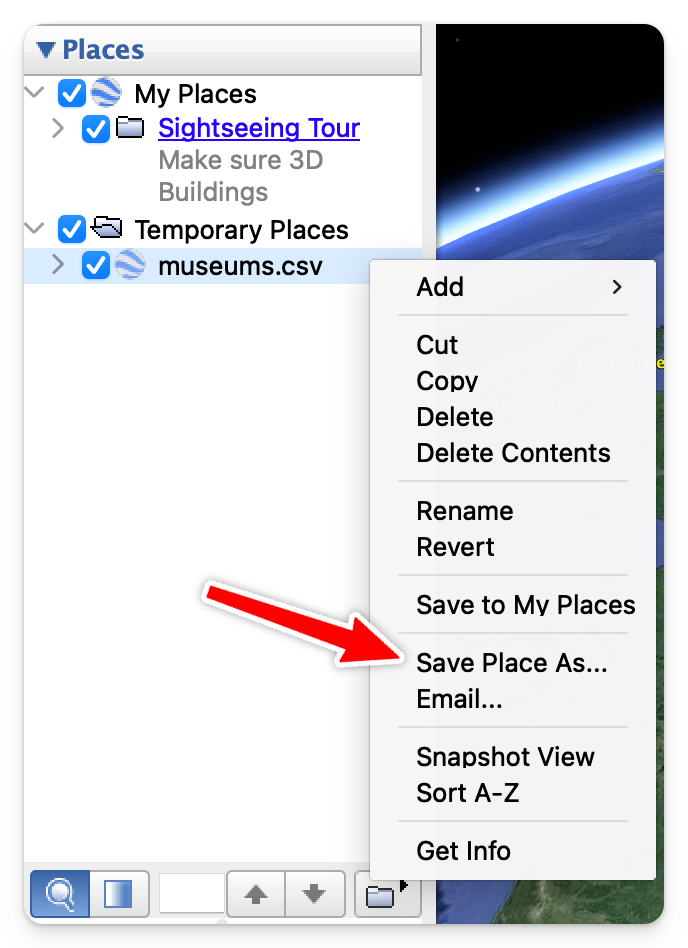
- Right click on the csv file in Temporary Places and select Save Place As. You can use the default KMZ option.
-
Go to MapHub and import the KMZ file into a map.
-
The addresses will now display correctly, with coordinates.
Congratulations for converting your addresses to coordinates.